−Table of Contents
Prompt For User Input Action
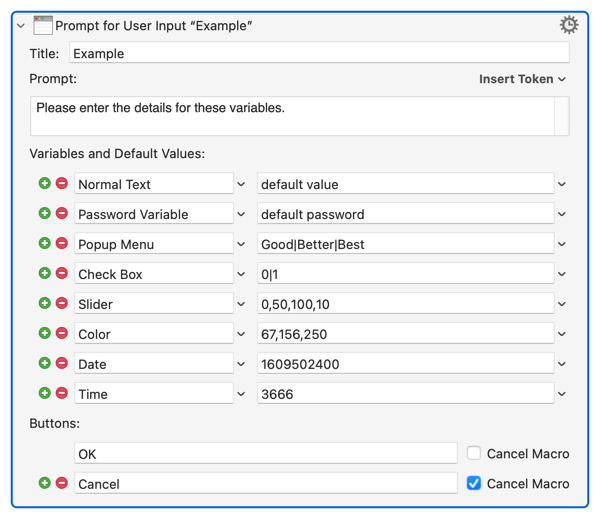
Prompt For User Input allows you to design a form that will ask for user input, storing the results in Keyboard Maestro Variables.
You can prompt for variables with text, checkbox, popup menu, or password fields.

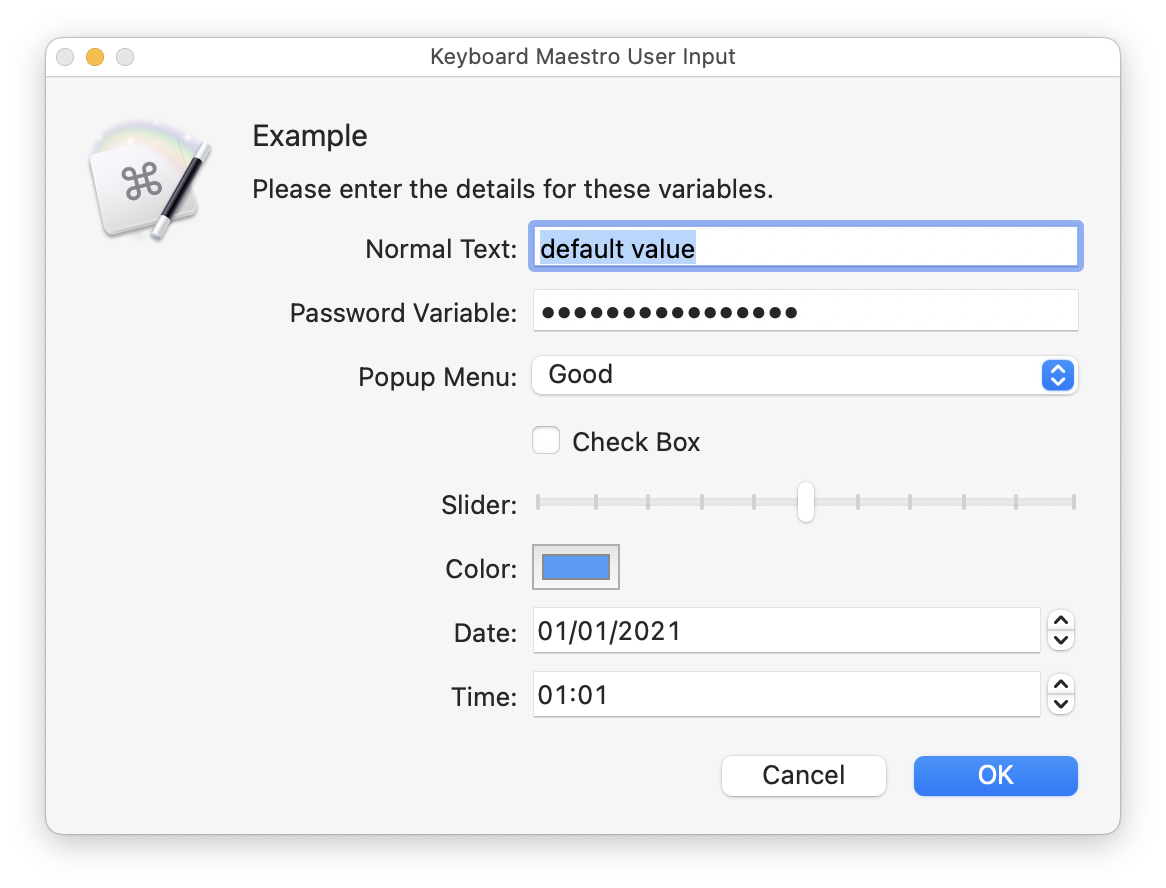
This action produces this Display:

Form Fields
The Prompt for User Input form (hereafter called “form”) provides form fields for the following:
| Field | Type | Purpose/Use |
|---|---|---|
| Form Title | Display Only | Identify the Main Purpose of the Form |
| Prompt | Display only | Optionally provide instructions and/or display Variables |
| Keyboard Maestro Variables | Display/Edit | Optionally allow you to input variable values. Variables may be displayed as Text (Single Line, or Password), Popup Menu, or Checkbox, Slider (v10.0+), Color (v10.0+), Date or Time or Date&Time (v10.0+) |
| Buttons | Standard Mac | Allow you to accept, cancel, or provide other responses you may define |
Form Title
The Form Title is plain text, provided to communicate the basic purpose, or the name of the macro, to the user. It may contain any of the Keyboard Maestro Tokens. It is for display only, and cannot be changed by the user when the form is displayed.
Prompt
The Prompt is plain text, provided to provide instructions or data to the user. It may contain any of the Keyboard Maestro Tokens. It is for display only, and cannot be changed by the user when the form is displayed.
Variables
The Form may contain zero or more Variable lines, with each line providing two form fields:
- A default value for the Variable, which also implies the type of entry.
Using the menu selection to the right of the default value (v10.0+), you can specify the type of the field:
- Automatic
- Text
- Password
- Checkbox
- Menu
- Slider
- Color
- Date
- Date and Time
- Time
- Time with Seconds
Automatic
Automatic type will guess the type based on the value of the default field - if it contains “|” bar separated fields, then it will be a menu, or a checkbox if all the values are 0 or 1, and if the variable is a Password variable (starts or ends with “Password” or “PW”), then a password field will be used.
Text Field
The field will be displayed as a single line text input field.
The default field is a token text field.
Password Field
The field will be displayed as a single line password input field, displayed with bullets instead of characters.
The default field is a token text field.
Checkbox
The field will be displayed as a checkbox. If the default value is “0”, or starts with “0|”, then the checkbox will default to off. If the default value is “1”, or starts with “1|”, the checkbox will default to on.
The default field is a token text field.
Menu Field
The field will be displayed as a popup menu.
The default value defines the choices, separated by a bar “|”, like: “Good|Better|Best”.
The first value in the list of choices will be selected in the menu by default. For example, if you would like “Better” to be the default Popup value, then use “Better|Good|Better|Best”.
If the menu item is a dash “-”, a menu separator will be used in its place. For example, “Good|Better|Best|-|Terrible”.
If a menu items is separated in to two parts with two underscores (_), then the first part is used as the result, while the second part is displayed in the menu. For example, “B__Good|F__Fail|C__OK|B__Good|A__Excellent”.
The default field is a token text field, so you can include variable options in your list, for example: “%Variable%First Choice%|%Variable%Second Choice%”. If you want to provide a list in a variable, then you do so by starting the field with a bar (“|”), followed by your list (or your default value and then your list) in a variable (which contains choices separated by |), for example “|%Variable%Current Choice%|%Variable%Choice List%”. Without the leading bar, the entry is separated by bar first, and then token expansion is applied to each field, so that fields may contain bars, for example, “This|That|%Variable%One Entry%”.
Slider Field
The field will be displayed as a slider.
The default value defines the initial value and range of the slider. It can contain from zero to four comma-separated values, which are either: 0. initial value of 50, range 0-100. 1. initial value as specified, range 0-100. 2. range as specified, initial value half way between. 3. minimum, initial, maximum value as specified. 4. minimum, initial, maximum value as specified, and if the last value is greater than zero, the gap between allowed values, and if it is less than zero, the number of allowed values.
For example, “0,50,100,10” means a range from 0 to 100, initial value of 50, and only valid values of 0, 10, 20, 30, … 90, 100.
The result stored in the variable will be the value of the slider.
This default value field is a calculation field.
Up to Keyboard Maestro version 10.2, the result of the slider will always be an integer, and any initial value above 100 will be clipped to 100 (forum). Neither of these limitations apply in version 11.0+.
Color Field
The field will be displayed as a color well.
The default value defines the color with three or four comma-separated values, being the red, green, blue and optional alpha values. All values have a range of 0 to 255.
This default value field is a calculation field.
Date and Time Fields
The field will be displayed as a date, date & time, time, or time with seconds field.
The default value is unixtime for the date and time. For time-only values, you can use either a unixtime or a time in seconds in the day (so 28,800 would be 8am) - either way the result will be in the same day as the specified default value.
This default value field is a calculation field.
Labels
It can be a good idea to have a common prefix in all of the variables used by the same macro. This clearly identifies the macro that uses these variables, and groups them together in the Variables section of the Keyboard Maestro Preferences. But you may not want to expose this prefix to the user running the macro.
So, you can hide the prefix if the variable name starts with a prefix followed by two underscores. Then the label will show only the latter part of the variable name.
Similarly, you can use Instance or Local variables, and the “Instance” or “Local” will be removed from the variable name when displayed in the form.
For example, variables named “MyMacro__Text Message”, “Instance Text Message” or “Local Text Message” will all display the label “Text Message” in the form. The actual variable used will be the full variable name.
Buttons
By default, the Prompt for User Input Action comes with two buttons:

- Responds to shortcut ⏎ (RETURN)
- Closes the Prompt.
- Flows proceeds to next Action.

- Responds to shortcuts of either ⎋ (ESCAPE), or ⌘. (COMMAND-PERIOD)
- Closes the Prompt without writing the variables.
- Cancels the Macro
You can add more buttons to allow for other options. For example, “Save” and “Save and Send”.
You can optionally assign a shortcut key by applying a suffix to the Button Name in the form of /«character», which will cause the Button to respond to a keystroke of ⌘«character» (or just «character» if there are no focusable text fields).
| Suffix | Button Responds to Shortcut Key of: |
|---|---|
/. | ⎋ (ESCAPE) key. |
/ | ⏎ (RETURN) key. |
/H | ⌘H keystroke (as an example) (or just H if there are not any text fields in the form) |
/- | no shortcut |
Result Button
The %PromptButton% token (v8+) is set to the name of the button pressed, and can be used in actions later in this instance like any other text token. The deprecated Result Button variable is also set to the name of the button pressed.
How Buttons are Processed
- The first button (from the top) has a default key of ⏎ (RETURN), unless you have assigned the RETURN response to another button using “/” at the end of a button name, or marked the button to cancel the macro.
- The second button has a default key of either ⎋ (ESCAPE), or ⌘. (COMMAND-PERIOD), unless you have turned off canceling the macro for that button or assigned the ESCAPE response to another button using “/.” at the end of a button name.
- Any button can Cancel the macro if the “Cancel Macro” checkbox is checked for it.
- Other buttons have no default key.
- Whatever button has the RETURN response will be the Default button, and will be highlighted in blue appropriately by the system.
- If you have the system preference “Use keyboard navigation to move focus between controls” enabled, the button shown with a colored outline (usually blue) can be chosen/activated by pressing the SPACE key.
Guidelines for Good Button User Experience
- The default button should be the “OK” button, the one that performs the normal behaviour.
- The default button should be rightmost.
- The left most button should be “Cancel”.
- Other buttons may vary.
- If the normal behaviour is significantly dangerous, then it may be appropriate for it to not be the default button, or for there to be no default button.
“Normal behaviour” here is defined as doing what the user just asked to do.
A consequence of all of this is that if you have a second button in the Prompt For User Input action, and it does not cancel the macro, then you should definitely give it some other key, or disable it with “/-”.
Notes
Note that the system will not allow Keyboard Maestro Engine to see keys typed in its own windows so the Typed String triggers will not work within Keyboard Maestro Engine windows.
See Also
Actions
- Alert action
- Prompt With List action
- Prompt for File action
- Prompt for Screen Rectangle action
- Custom HTML Prompt action
- Show Palette of Macros action
- Get Touch Bar Selection action
Tokens
- %AlertButton% token
- %PromptButton% token
- %HTMLResult% token