**This is an old revision of the document!**
Table of Contents
Plug In Actions
You can develop custom Macro Actions using a facility known as Plug In Actions. After you install a Plug In Action in your local Keyboard Maestro Support folder, you can use them like the built-in Actions.
Third Party Plug In Actions
You can download Plug In Actions developed by others from these sources:
How to Install
Plug In Action Install Files are .zip Archive Files
- Initial Install: Drop on the Keyboard Maestro app Dock icon
- This will create a Plug In Action sub-folder by the same name as the
.zipfile - Do not unzip the file
- To Update An Existing Plug In Action
- First Manually Delete or Move the Plug In Action Sub-Folder from:
~/Library/Application Support/Keyboard Maestro/Keyboard Maestro Actions/ folder - Then Drop the
.zipfile onto the Dock Icon
How To Use a Plug In Action
Plug In Actions are used just like the built-in Keyboard Maestro Actions.
After you have installed a Plug In Action, you may need to restart both the Keyboard Maestro Editor and Engine in order for the new Plug In Action to be recognized by Keyboard Maestro.
- In the Keyboard Maestro Editor, goto File > Quit Engine.
- Quit and re-launch the Keyboard Maestro Editor. This will also start the Engine.
To insert a Plug In Action into your Macro, use any of the normal methods to insert Actions:
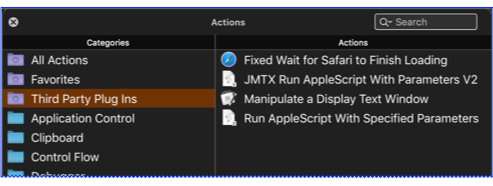
- Display the Actions Panel from the menu or with the shortcut ⌘K, and select the Third Party Plugins folder:
- Menu Edit > Actions > Third Party Plugins
- Insert Action by Name, using shortcut ⌘⌃A.
Enter the Plug In Action form fields (parameters) that are shown on the action form.
Building a Plug In Action
How to Create a Plug In Action
There is no easy way to create a Plug In Action. There is no one editor (except maybe BBEdit) that can be used to create all of the files that are needed. Probably the best way to get started is to examine an existing Plug In Action, like this one:
- Fixed Wait for Safari to Finish Loading Plug In Action by @PeterNLewis.
Steps to Create a Plug In Action
- Folder: Create a folder on your local drive, using the same name that you will use for the Plug In Action, put the following files in this folder.
- Plist: Create a file named Keyboard Maestro Action.plist, which is a standard Cocoa Property list file that defines the Plug In Action form.
- See Plug In Action Plist Definition below.
- The Plug In Action Plist is an XML which defines the Action form you see in the Keyboard Maestro Editor, and identifies the name of the script file that will be run when the Plug In Action is executed in a triggered macro.
- Script: Create a script file named Action.scpt, or other suitable name (like the name of your Plug In Action), which can be an AppleScript, JXA, or Shell Script, to process the data from the Plug In Action form.
- Icon: Create icon.png which is the icon that will be displayed in the Keyboard Maestro Editor. This file is optional.
- Zip Install File: When you are finished with all of these files, create a
.ziparchive from the Plug In Action Folder.
Plug In Action Folder
A Plug In Action is Contained in a Folder, Whose Name:
- Should generally closely match the action name
- Must be made up of only ASCII alphanumerics, underscores and spaces.
- Must be unique among all plug in actions.
- Is stored in the Keyboard Maestro Macros.plist to reference the plugin action.
The Plug In Action folder contains a set of files, including:
- Keyboard Maestro Action.plist – an XML file describing the action.
- A script file
- whose name must be made up of only ASCII alphanumerics or underscores, plus an ASCII alphanumeric extension.
- It may be a shell script or an AppleScript.
- If it is a shell script, it will be made executable automatically.
- Icon File: 64×64 png icon (optional).
The Plug In Action Folder must be stored as a .zip archive file for installation.
Plug In Action PList
The format of the Keyboard Maestro Action.plist is a Cocoa Property list containing a dictionary with the following keys and values:
| Key | Description |
|---|---|
| Name | Name of the action. (which appears in the Category/Actions list) |
| Script | Name of the script file which will be run when the Plug In Action is executed. The name can only use ASCII alphanumerics or underscores, plus an ASCII alphanumeric extension |
| Parameters | An array of parameters to the script
|
| Icon | Name of the icon png file, made up of only ASCII alphanumerics or underscores plus .png Optional |
| Title | The title displayed on the action
|
| Timeout | The default timeout in seconds
|
| Author | The author of this action Optional |
| URL | URL for the author or this action Optional |
| Help | A short (Tool Tip) explanation of this action Optional |
| HelpURL | A URL for the Help link for the action (v11.0+) Optional |
| Results | What to do with the output of the script if any. Possible Values:
Multiple values can be used, separated by a bar (|), the first specified value is the default |
Plist Parameters
| Parameter Key | Description |
|---|---|
| Label | Name of the parameter.
|
| Type | Type of the parameter. Must be one of the following: (Text in italics is info, and not part of the Type)
The Type specifies how the value is displayed to the user and what processing is applied before it is passed to the script. |
| Menu | Values of the popup menu, separated by | Optional unless Type is PopupMenu. |
| Default | Default value of the Parameter when the Plug In Action is inserted in the Macro. Optional |
Each parameter in the Parameters array is a dictionary with the following keys:
Warning: Keys are case sensitive.
Retrieving Parameters in a Script
Parameters are passed to the script via environment variables with names starting with KMPARAM_, similar to how variables are passed to shell scripts with the Execute Script action.
So a parameter named “My Text” would be in an environment variable KMPARAM_My_Text.
Note that spaces in the variable names must be replaced with underscores in your script.
Methods To Retrieve Parameters Using AppleScript
--~~~~~~~~~~~~~~~~~~~~~~~~~~~~~~~~~~~~~~~~~~~~~~~~~~~~~~~~~~
--»	1.  Use AppleScript "system attribute"
--~~~~~~~~~~~~~~~~~~~~~~~~~~~~~~~~~~~~~~~~~~~~~~~~~~~~~~~~~~
-- This method is "not safe for international characters" (and emoji)

set myText to system attribute "KMPARAM_My_Text"

--~~~~~~~~~~~~~~~~~~~~~~~~~~~~~~~~~~~~~~~~~~~~~~~~~~~~~~~~~~
--»	2.  Use Shell Script with "echo"
--~~~~~~~~~~~~~~~~~~~~~~~~~~~~~~~~~~~~~~~~~~~~~~~~~~~~~~~~~~
-- This method works with emoji and international characters
-- but multi-line text (as from a TokenText form field)
-- will be flattened into a single line

set myText to do shell script "echo $KMPARAM_My_Text"


--~~~~~~~~~~~~~~~~~~~~~~~~~~~~~~~~~~~~~~~~~~~~~~~~~~~~~~~~~~
--»	3.  Use Shell Script with "printenv"
--~~~~~~~~~~~~~~~~~~~~~~~~~~~~~~~~~~~~~~~~~~~~~~~~~~~~~~~~~~
-- This works with emoji, international characters and multi-line text
-- however printenv returns an error if KMPARAM_My_Text doesn't exist.
-- You can catch this error with a try command.

try
  set myText to do shell script "printenv KMPARAM_My_Text"
on error -- Parameter does NOT exist
  set myText to ""
end try
Reload to Use Updated Plug In Actions
In normal use, once a plug in action is read, it will stay in memory and changes will not be noticed (although the script will be executed each time, so changes to that will be noticed). To cause the editor and/or engine to notice changes to the plug while in development, use AppleScript to reload the macros:
tell application "Keyboard Maestro" to reload
tell application "Keyboard Maestro Engine" to reload
Plug In Action Failure
If the Plug In script fails, the action will fail, potentially aborting the macro.