**This is an old revision of the document!**
Table of Contents
![]()
Found Image
Although it is generally better to use high level actions like Press Button or Resize Window, it is sometimes necessary to resort to looking at the screen for a specific image and responding appropriately (behaving differently if it exists, clicking on it, moving things to it, etc).
There are various actions (Move or Click Mouse, Find Image on Screen, conditions and collections that search the screen for a matching image.
Example: Click on Found Image
This is how the Action appears when first inserted into your macro.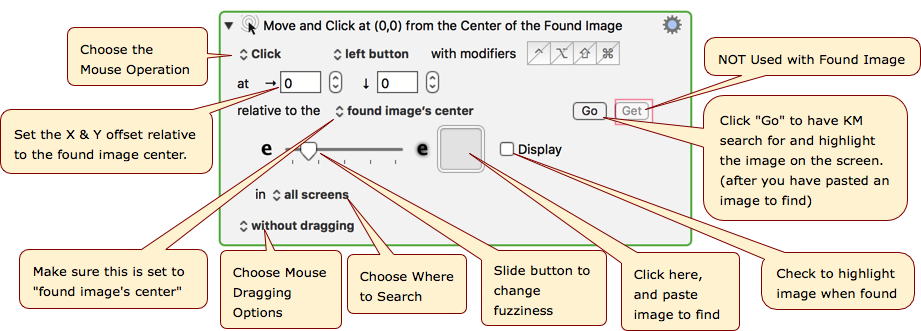
How To Use
Specifying Fields in Found Image Actions
- Specify the image to match
- Paste an image into the image well
(Use ⌘⌃⇧4 to Take a screenshot of part of your screen). - To view the image in the image well, click on it and press SPACE.
- You can copy the image from the Image Well.
- Specify the amount of fuzziness allowed
- Because of transparency and anti-aliasing almost all screen matches are fuzzy to some degree.
- But usually about 20% is a good place to start.
- Must be Unique Checkbox
- If checked, then the image must be the only image in the specified area, or the Action will fail.
- If not checked, then best one of the images (based on an internal algorithm) will be selected. If there are multiple similarly good matches then it is unpredictable which one will be used.
- Display Checkbox – If checked, it will highlight on the screen all found matches
- This can be helpful in debugging, like determining the right amount of fuzz to use.
- It will also show when an image is being found in more than one location.
- Choose Where to Search for Image
- All screens.
- Main screen.
- Specified screen (counting from the left).
- Front window.
- Window with a specified title.
- Window with a title containing a given string.
- Window with a title matching a given regular expression.
- Specified window (counting from the frontmost window).
- Specified area on the screen.
- For instructions on how to get data for area, see Determine Location of Area to Search for Found Image
Search in Specified Area
Remember when specifying the area, as with all numeric fields, the numbers can be calculations including functions, and the fields expand to allow for longer expressions as soon as you type something other than a number, so this allows very precise control of where you can match.

Search Speed and Accuracy
Keyboard Maestro uses a relatively fast search to make the action perform in a reasonable amount of time, but it can result in not finding some images.
- Images Difficult to Match
- The most difficult images to match are small grey images (like icons or text).
- Since the screen tends to be filled with small grey areas, it is hard for Keyboard Maestro to find the best locations to look.
- Increasing Search Accuracy
- Set Search Area to less than a quarter of the whole desktop
- This will improve ability to find smaller images that have low contrast
Testing
When testing found image macros:
- ALWAYS hide the Keyboard Maestro editor – as the image in the found image action may be found too under some circumstances.
- ALWAYS turn ON the “Display” checkmark, so you get visual confirmation an image has been found.
- If the image is NOT found ALWAYS play with the fuzz slider.
- It's generally a good idea to initially test on the main monitor in the front window.