Table of Contents
Move or Click Mouse Action
The Move or Click Mouse action allows you to move, click or move and click the mouse using any mouse button, and optionally dragging.
You can specify modifiers such as the shift key, as well as the position, relative to any corner of the front window, the main screen, or the current mouse location, or a found image on the screen.
Examples
Simple Example: Click Mouse at Location Relative to Window

Setup of Action
As you select options further settings may become available. For example, if you click then you can also choose a button to click with and whether or not to also press a modifier key such as Control.
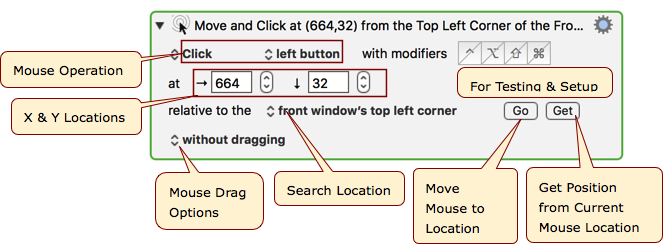
Mouse Operation
- Just Move.
- Click.
- Double Click.
- Triple click.
- Release.
Mouse Button
- left button (default)
- right button
- center button
- button 4
- button 5
- button 6
Modifier Keys
Select zero or more modifier keys by clicking the relevant icon:
- Control — ⌃.
- Option — ⌥.
- Shift — ⇧.
- Command — ⌘.
When a modifier key is included the icon is filled with blue.
X & Y Locations for Mouse Action
- Enter Coordinates in pixels
- Location may be absolute or relative, based on next setting.
Location Relative To
- mouse location.
- absolute position.
- front window's corner (top left, top right, bottom left, bottom right).
- front window's center.
- screen's corner (top left, top right, bottom left, bottom right).
- screen's center.
- found image's corner (top left, top right, bottom left, bottom right).
- found image's center.
To get the relative distance (offset) of the Mouse position relative to some location, like the window top, left corner, use the Get button after you have set the relative to location.
Setup and Testing
The Go and Get Buttons are used only during setup of the Action. They have no effect when the macro is executed.
- Go button moves the mouse to the specified X & Y location.
- Get button sets the X & Y location to current mouse position
- Relative to the location set by the relative to popup
- Gives you a countdown from 5 to allow time to move the mouse pointer.
Mouse Drag Options
Specify from the pop-up whether the click operation is:
- without dragging.
- and drag to.
- and drag absolute.
- and drag relative.
- and hold.
Notes:
- buttons that are pressed stay pressed only as long as the macro continues to run.
- use the gear icon at top right of the action to select whether or not to Restore Mouse Location.
Click at Found Image
You can also click relative to a Found Image. By default the image has to be unique (which includes not being visible in the action if the image is small enough not to be shrunk in the image well) otherwise Keyboard Maestro will not know where to click. Alternatively, you can specify which image to click (Best, Topmost, Leftmost, Bottommost or Rightmost). You can also use the Find Image on Screen action or the For Each action with the Found Images collection to find all matching images and click on them as appropriate.
Specifying Fields in Found Image Actions
- Specify the image to match
- Paste an image into the image well
(Use ⌘⌃⇧4 to Take a screenshot of part of your screen). - To view the image in the image well, click on it and press SPACE.
- You can copy the image from the Image Well.
- Alternatively, you can get the image to search from the System Clipboard, Trigger Clipboard, a Named Clipboard, an Icon, a file, or from an image elsewhere on the screen.
- Specify the amount of fuzziness allowed
- Because of transparency and anti-aliasing almost all screen matches are fuzzy to some degree.
- But usually about 20% is a good place to start.
- Unique Menu
- By default, the image must be unique on the screen so that Keyboard Maestro knows where to click, otherwise the action will fail.
- Alternatively, you can have Keyboard Maestro click based on the best match, or (v9.0+) click on the topmost, leftmost, bottommost, or rightmost match.
- Display Checkbox – If checked, it will highlight on the screen all found matches
- This can be helpful in debugging, like determining the right amount of fuzz to use.
- It will also show when an image is being found in more than one location.
- Choose Where to Search for Image
- You can search in all screens, or on a specific screen.
- Alternatively, you can search within a specific window.
- However, the window must be in the frontmost, active, application, in order for it to be seen by this Action.
- Or you can search within a specific area on the screen.
- For instructions on how to get data for area, see Determine Location of Area to Search for Found Image
Search in Specified Area
Remember when specifying the area, as with all numeric fields, the numbers can be calculations including functions, and the fields expand to allow for longer expressions as soon as you type something other than a number, so this allows very precise control of where you can match.

Note that in the above screen shot, the WINDOW(0,Left) function is referring to the frontmost window in the frontmost app. To refer to other windows in the frontmost app, you need to change the index parameter of the WINDOW function.
If the click offsets are all fixed values (not calculations), you can select the image well and press SPACE to show the image with the location of the click displayed on the image (v11.0+).
There is an option in the action (gear) ⚙ menu to have the action wait until the image appears (v11.0+).