Table of Contents
Keyboard Maestro 7 User Manual
Overview
Keyboard Maestro will take your Macintosh experience to a new level. Keyboard Maestro enables you to create or record custom macro shortcuts that you can activate at any time. For example, your macros could help you navigate running applications or work with an unlimited number of clipboards. Best of all, every macro you create is available using simple keystrokes you choose or a variety of other triggers. The only limit to Keyboard Maestro is your imagination!
Using Keyboard Maestro’s powerful Macros, you can make your Mac behave the way you want it to behave – open documents when and where you want them, type sentences with the press of a key, expand abbreviations into entire paragraphs, control web applications, and much more. You simply define what you want your Mac to do and when you want it done.
Keyboard Maestro comes complete with a clipboard history, saving everything you copy for later use so you’ll never lose something on your clipboard again, as well as named clipboards where you can store commonly used images or text.
Keyboard Maestro also includes a powerful Application Switcher and Window Switcher so you can cycle through applications or windows, closing, hiding, launching, and more as well as an Application Launcher that lets you quickly launch applications.
Keyboard Maestro requires a Mac running OS X Yosemite 10.10.0 or later.
Keyboard Maestro is free to try with no limitations. Once the trial period ends, a license must be purchased to continue using it.
What’s New?
Keyboard Maestro 7 expands on the powerful base of previous versions, enhancing the editor, adding themed palettes, lots of new actions and additions to the engine. Keyboard Maestro 7 requires OS X 10.10.0 Yosemite or later (10.10.3 or later recommended).
7.3.1
- Fixed Send Mail Message action send now option in Sierra.
- Fixed read/write variables in Custom HTML Prompt in Sierra.
- Ensure Composite onto Image action works on pixels, regardless of DPI.
- Fixed variable popup menu occluding to field in Substring action.
- Fixed a possible memory corruption issue.
- Added warnings and advice about App Translocation.
7.3
- Added contextual menu to the No Action pseudo-action.
- Added option to disable automatically showing the Action Selector.
- Added NSSupportsAutomaticGraphicsSwitching option as the integrated GPU should be sufficient.
- Added “Or by URL” in the Trigger selection.
- Added Set Image DPI action.
- Added %ExecutingMacroGroupUUID% and %ExecutingThisMacroGroupUUID%% tokens.
- Added Edit → Find in All Macros (Command-Option-F).
- Added “loop” as a search synonym for the Repeat action.
- Added disable backslash or token processing option to Open a URL action.
- Added Timeout option to various Safari/Chrome actions.
- Added descriptive text then macro is disabled or all actions are disabled.
- Open a URL action reports and optionally aborts on failures.
- Improved dragging display of File Reference Button.
- Support dragging Macro Groups to the trash.
- Support Copy and Paste for Macro Groups.
- Search more thoroughly for images if the source area is smaller.
- Significantly sped up switching to macro/smart groups with lots of macros.
- Remember scroll position of recently edited macros.
- Add accessibility access for “selected” boolean.
- Fixed an issue importing/duplicating macros with references to other macros with Switch actions.
- Ensure all the image resizing actions operate on pixels, regardless of DPI.
- Fixed occasional left/right jiggle of macro edit detail view.
- Removed ambiguous close button from Prompt for User Input window.
- Ensure search looks for matches in the optional parameter of Execute a Macro actions.
- Default Send Mail Message action to just opening the new mail message.
- Fixed code signing issue for macOS Sierra.
- Report failure for Open a File action if file does not exist.
7.2.1
- Allow “hotkey:” alone to search for any macro with a hot key trigger.
- Added Enable/Disable/Toggle as synonyms for Set Macro Enable action in New Action by Name.
- Added MouseGetCountdown hidden preference.
- Ensure duplicated/pasted/etc Type a Keystroke actions do not focus on the keystroke.
- Changed Display Clipboard to retain keyboard focus (so Command-W works).
- Allow 0 for MaxClipboardHistory hidden preference.
- Properly record Double and Triple Click and Drags.
- Show Status Menu action allows keyboard activation/movement (after short delay).
- Change “Select a Window” new action name to “Bring a Window to the Front”.
- Changing the name of a macro is immediately reflected in actions that refer to it.
- Correctly sort iTunes tokens in Insert Token menu.
- Fixed issue with gCurrentExecuteActionListEntry assertion.
- Fixed an issue importing/duplicating macros with references to other macros.
- Fixed an issue searching for macros by UUID.
- Fixed an issue where shrinking the window could result in column sizes less that the minimum allowed.
- Fixed a bug with Prompt for User Input action buttons.
- Fixed a bug where actions within Switch actions were not being searched.
- Fixed a bug when selecting a macro to edit from a palette.
- Fixed a bug with Folder triggers if macros were copy and pasted.
- Fixed Web Server password to be change immediately you enter text, not waiting for Tab.
- Fixed unicode surrogate pairs display in web server.
- Fixed Clearing Recent Applications to apply to both editor and engine.
- Significantly optimized setup of variables in Execute JavaScript in browser.
7.2
- Added token variable array access like %Variable%Var[5]%
- Added 'is before' and 'is after' to Clipboard, Text, Script, Environment Variable and Variable conditions.
- Added 'is before' and 'is after' to Switch case action.
- Added CALCULATE() function which processes token text and then calculates.
- Added trigger: and hotkey: search filter.
- Added name: search filter.
- Added Evergreen palette theme thanks to @iampariah on the forum.
- Added Reopen Windows option to Application Switcher.
- Clipboards display plain text when rich text is blank and plain text is not.
- Use canonical order of modifiers with Smart Group searching.
- Allow Private Use Characters (like ) in Typed String triggers.
- Make the All Macros Smart Group immutable.
- Macros take on the icon of the action if there is a single non-comment icon.
- Add “Delay” as synonym for Pause/Wait when searching for actions.
- Better file name for exports of more than one macro.
- Show calculation in Set Variable to Calculation title.
- Support token expansion in Substrings In collection.
- Focus on key input field when Type a Keystroke action is added but not when disclosed.
- Defend against a crash when the system cannot find a running application.
- Added Write/Append File action disable backslash or token processing option.
- Added Insert/Display Text action disable backslash or token processing option.
- Added Set Clipboard to Text action disable backslash or token processing option.
- Fixed Set Variable to Text action disable backslash or token processing option.
- Fixed code signing issue for macOS sierra.
- Fix wiki help links for File and Plug In actions.
- Fix variables with unicode characters in calculations.
- Fixed an issue with the rotating status icon when the editor was also performing tasks.
- Avoid filling the log up complaining about missing optional Results field in Plug In actions.
- Fixed a display glitch in Plug In actions.
- Deleting the first item of the clipboard history did not fire the (/trigger/Clipboard Changed) trigger.
- Adjust Prompt for User Input action to not set default keys for incorrectly “Cancel Macro” flagged buttons.
- Fixed a bug in the Typed String trigger after a simulated delete and optional non-ASCII character.
- Use localizedStandardCompare for palette ordering.
- Added %FinderInsertionLocation% token (usually path to front Finder window).
- Fixed an issue tracking window changes immediately after the app is launched.
- Fixed Set Action Delay action for This Macro to apply to the whole macro, not just the action list.
- Fixed issue with %TriggerValue% token for the Focused Window trigger.
- Fixed Set Macro Enable action not causing palettes to adjust.
- Fixed Press Command, Press Tab, Release Command, Release Tab bug.
- Fixed line count to include blank lines.
- Fix spelling of 'focused'.
7.1.1
- Optimizations to drop simple text expansion macros size by 30%, down to 160 bytes.
- Ensure Creation/Modification time is set when macro groups / macros are created.
- Add Split/List/Loop as search matches for For Each action.
- Add Wait as search matches for Pause actions.
- Add Pause as search matches for Wait for Browser actions.
- Add Say as search matches for Speak Text action.
- Add Split as search matches for Substrings In collection.
- Fixed bug with Periodic trigger units.
- Fixed bug with finding images on screen.
7.1
COMPATIBILITY NOTE: Folder Trigger now sets %TriggerValue% to the full path. Adjust macros to account for this.
COMPATIBILITY NOTE: Search Variable/Clipboard actions now fail if the match fails. Adjust actions to disable aborting/notification when the match fails if desired, ensuring you handle the case where the target variables are not modified by the action.
- New Execute a JavaScript in Custom Prompt action.
- Added timeout to Custom HTML Prompt.
- Added window.KeyboardMaestro.Trigger( macro, value ) to Custom HTML Prompt.
- Clear HTML Result Button variable when Custom HTML Prompt starts.
- Custom HTML Prompt can autofocus on textareas.
- Custom HTML Prompt added call to KMDidShowWindow().
- Added Paste Above.
- Use custom icon for Macro Group Icon Palettes.
- Detect and report Secure Input Mode process.
- Detect and report idiotic “Allow JavaScript from Apple Events”.
- Added support for configurable Safari and Chrome applications.
- Added an option to Set Variable to Text to disable backslash or token processing.
- Added AppleScript setvariable/getvariable commands, primarily for JXA.
- Allow action timeouts of hundredths of a second.
- Editor now quits the Engine on launch if all modifiers are held down.
- Imported macros are now disabled if all modifers are held down.
- Search Variable/Clipboard actions now fail if the match fails.
- Save revisions even if Keyboard Maestro editor was open over night.
- Adjusted non-recursive For Each Path in Folder to read the entire folder at the start.
- Adjusted short trigger display for arrows and Page Up/Down.
- Adjusted Pixel condition a little.
- Allow Share to Forum of macros with , or ; in their name.
- Allow %Variable%<space>Variable Name<space>%.
- Allow Max Concealed Position of 1.
- Allow tokens in the Press Button action.
- Performance improvements in some editing cases.
- Remove white popup menu hover bug in El Capitan by default.
- Fixed display of Move Mouse, Found Image title text field.
- Fixed variable popup in Write/Append text to file editor.
- Fixed Variable selector popup not working in Find Image action.
- Verify code signing of version control update file.
- Use HTTPS for all wiki linked help.
- Use HTTPS for all version control, feedback, crash reporting, etc.
- Use HTTPS for all documentation and web site links.
- Make Click Link operate asynchronously.
- Avoid excessive slowdown while typing in Set Variable to Browser Field action editor.
- Fixed a crashing issue with finding images on screen.
- Fixed a crashing issue with undo.
- Fixed restoring selection issue with undo.
- Fixed a potential bug that can corrupt variable types in the Custom HTML Prompt action.
- Fixed handling of Escape in Share to Forum sheet.
7.0.3
- Fixed a crash in getting Keyboard Layout Icons.
- Fixed an issue with Conflict Palettes with more than one column.
- Worked around (again) Mail AppleScript bug that breaks Send Mail Message with attachments.
- Added help to the Insert Action menu (when holding the Option key).
- Changed Execute Macro with Parameter to tokenize its parameter.
7.0.2
- Extended variable character set to allow all unicode letters and digits.
- Extended Set Keyboard Layout to include input methods (eg Hiragana, Pinyin, etc).
- Support AppleScript 'variable “X” exists' facility.
- Support text completion for coordinate text (eg v.left).
- Added Execute Macro to Keyboard Maestro action list category.
- Added AutomaticCompletion preference to disable auto completion.
- Fixed a crash in the editor when you turned off editing mode.
- Fixed an issue where the engine quit when the editor was launched.
- Fixed an issue where macro groups could be active when the palette was not showing.
- Fixed an issue with the Folder Trigger triggering when another Folder Trigger fires.
- Fixed Pixel condition for “is less blue than”
- Fixed issue with some two character systems and entering macro names.
- Fixed an issue where Center window was centering on the main screen.
- Fixed a potential issue with Set Variable to Web Browser Field.
- Fixed non-edit display of some Write to File formats.
- Fixed maximum opacity issue in switchers.
- Removed On/Off from tooltips in toggle buttons.
- Reduce NSRunningApplication logging.
- Allow Share to Forum of macros with / in their name.
- Worked around more NSRunningApplication issues.
- Worked around a bug in Mail/OS X 10.11 affecting the Send Mail Message and leave open.
- Hacked around a bug in Mail/OS X 10.11 affecting the Send Mail Message with attachments.
- Ensure clipboard issues debugging window stays visible.
7.0.1
- Allow 10.10.0-2, with a warning about Yosemite bugs.
- New Safari/Google Chrome Tab now works if there are no windows open.
- Added Gemmell Purple palette style.
- Add control over notification of timeout failures.
- Turn gear icon blue if there is a note attached to the action.
- Support opening .kmaction files to add it to the current macro.
- Support Option-Return/Enter in Trigger Macro by Name to edit the macro.
- Fixed a crash when you switch the Screen Capture area to “Area”.
- Fixed a crash when editing the theme style of a macro group with no macros.
- Fixed a crash and other issues with the Folder Changed trigger.
- Fixed Wireless trigger multiple firing issue.
- Fixed Application “All Applications” trigger to only trigger for foreground applications.
- Fixed the Copy/Cut actions, not waiting long enough.
- Fixed the Copy to Named Clipboard action, not waiting long enough.
- Fixed Escape doing Get instead of Cancel on the Share to Forum sheet.
- Fixed use of user locale for %ShortDate% et al tokens.
- Fixed web server custom.css MIME type set to text/css.
- Fixed multiline text fields in plugin action editors.
- Fixed a problem with clipboard history in Word 2016.
- Fixed non-edit display of hot key tapped twice trigger.
- Fixed gear menu icon to update when the action was not disclosed.
- Fixed Undo while search field is selected to apply only to the search field.
- Fixed Find Image action to return the full results (left,top,width,height,fuzz).
- Fixed Set Color of actions on first control click to have color swatches.
- Changed Share to Forum to use PNG instead of TIFF.
- ChangedShare to Forum to post by https.
- Worked around system bug with GetProcessForPID that affected activating applications.
- Cleaned up some application handling code.
- Detect possible re-entrant call to load macros.
7.0
Editor Improvements
- Added Smart Groups.
- Added Insert Action by Name.
- Added autocomplete of tokens, functions, variables and search filters.
- Added Insert Action menu to Edit menu.
- Added disclosure folding for sub-action lists.
- Added action menu and contextual menu to macro actions.
- Added option to rename actions.
- Added color option to actions.
- Added note option to actions.
- Added control over Abort on Failure of actions.
- Added control over Notification on Failure of actions.
- Added Sort by Date Created; Use Count; Time Saved.
- Added Paste Above to action/contextual menu.
- Added Help link to action/contextual menu.
- Added Help link when option-selecting triggers/actions/functions/tokens/collections/conditions.
- Added status line below Macro Groups and Macro columns.
- Added Get/Go buttons to Mouse Click action.
- Added Macro Inspector window.
- Added Mouse Display window.
- Added Share button to main editor window.
- Share macros or actions directly to the forum.
- Added Import/Export of sets of actions.
- Changed search in editor to support words and quoted phrases.
- Changed search to support group:, app:, universal:, all:, enabled:.
- Highlight found triggers and actions in editor.
- Changed error display to only orange if the issue is an invalid variable value.
- Used/Backward/Forward/History macro history buttons.
- Improved display of toggle buttons (eg Modifiers/Days of the Week).
- Honor user's locale setting for First Day of the Week.
- Require Command-Delete to delete Macros Groups and Macro Groups.
- Added Deselect All in the Edit menu.
- Added Enter Action and Parent Action in the Edit menu.
- Single click on a selected item deselects other items.
- Sort the trigger list, conditions list and collection list.
- Limited the size of the Undo stack in the editor.
- Changed Insert Token and Function menus to be hierarchical.
- Add an “All Macros” entry in the macro selector popup macro.
- If you delete a macro, macro group or action, the following item is selected.
Themed Palette Styles
- Lots of different color styles.
- Control style, size, columns, opacity.
- Control whether the icon, text or trigger is shown.
- Control whether the palette shrinks to an icon when not in use.
Macro Additions
- Added Macro Groups available in Focused Window Macro Group targeting.
- Added Macro Groups available when applications are or are not running.
- Added Focused Window Changed Trigger.
- Added Folder Changed Trigger.
- Added Clipboard Changed Trigger.
- Added Sleep Trigger.
- Added support for double tap, triple tap, etc, Hot Key triggers.
- Added support for double tap, triple tap, etc, Device Key triggers.
- Added Custom HTML Prompt action.
- Added Switch/Case Action.
- Added Group Action.
- Added Execute Javascript for Automation (JXA) action.
- Added Execute Swift Script action.
- Added Simulate Hardware Key action.
- Added Type Modifier Key action.
- Added Set Action Delay action to control various speeds.
- Added Mark Macro action to mark/unmark status menu and palette icons.
- Added option to Press and Hold/Repeat keys, modifiers or hardware keys.
- Added option to Press and Hold mouse buttons.
- Added Swift and Javascript for Automation to Script Condition.
- Added Found Image on Screen collection to For Each action.
- Added explicit Area option to Screen Capture action.
- Added Screen Area limits for Found Image searches.
- Added Any Window Title condition.
- Added Set Keyboard Layout action.
- Added Conceal/Reveal All Palettes actions.
- Added Cut/Copy/Paste actions. CutCopy wait for the clipboard to change.
- Added Content Type/Kind, and Where From attributes to Get File Attribute.
- Added Added Date, Downloaded Date, Last Used Date attributes to Get File Attribute.
- Added Finder Comment to Get/Set File Attribute.
- Added Invisible to Get/Set File Attribute.
- Added Open 1Password Bookmark action.
- Added SECUREINPUT() function.
- Added CONCEALEDPALETTES() function.
- Added MENUBARHEIGHT() function.
- Added SCREENVISIBLE() function.
- Added %ScreenVisible% token.
- Added %MacroNameForUUID%UUID% token.
- Added Macro/Macro Group enabled/disabled/active/inactive condition.
- Added specific area option to Capture Screen Image action.
- Added Always Nominal Resolution option to Capture Screen Image action.
- Added option to exclude errors (STDERR) from script output.
- Added option to mouse action to allow drag destination to be absolute.
- Added filter to quote for AppleScript, Shell Script, JavaScript and Swift.
- Added filter to Percent Decode URLs.
- Added filter to get the value of a Named Variable or Named Clipboard.
- Added “with parameter” option for Execute Macro action.
- Allow Tokens in variable name of Set Variable to actions.
- Allow Tokens in Select Menu Item.
- Allow Tokens and menu paths (Edit→Copy) in Menu Condition.
Engine Additions
- Added optional Paste menu to Status Menu (with Paste Plain (shift) and Set-only (option)).
- Added kmtrigger: URL Scheme trigger (with parameter).
- Expand default clipboard history to 200 items.
- Added some clipboard flavor exclusions that cause problems in Word 2011 reading EBMS flavors.
- Added some clipboard flavor exclusions that cause problems in Word 2016 reading OLE LINK flavors.
- Added .width and .height in variables with only two entries (eg “123,456”).
- Added .fuzz option to calculations (specifically for the Found Image collection).
- Restrict environment variable size of variables to 100k.
- Variables whose names start with “ENV_” override regular environment variables (eg “ENV_PATH”).
- Added “with parameter” option for AppleScript “do script” triggered macros.
- Added parameter option for Web Server triggered macros.
- Palette and Status Menu triggered macros report the modifiers in the TriggerValue token.
- Default recorded mouse clicks to not restoring the mouse location.
- Added an implicit semaphore at the start of a quick recorded macro.
- Added option for Conflict Palette to appear under the mouse.
- Added option for Macro Group palettes to appear under the mouse.
- Added option to Application Switcher to allow switching only one window.
- Added Display Large option to execute and display text actions.
- Added AppleEvent to retrieve all the macro groups/macros even the inactive ones.
- Updated Trigger Macro By Name window.
- Updated Web Search window.
Editor Minor Changes
- Allow up to 9999 Seconds/Minutes/Hours in Periodic Trigger.
- Added link to Keyboard Maestro Wiki in the Help menu.
- Added link to Regular Expression Unicode Properties reference in the Help menu.
- Search Variable/Clipboard results show if the captured data includes more text than displayed.
- Added information to empty web browser action insertion menus.
- Wireless Network trigger can now fill in wifi text field.
- Added Insert Text by Typing variant to action selector.
- Added Click at Found Image variant to action selector.
- Preserve leading spaces in non-edit script display.
- Better preserving of selection when compiling AppleScripts.
- Changing Write File format while holding the option key disables changing the extension.
- Added a cache of rich text for compiled scripts to avoid needing to recompile them.
- Updated Or by Script to include JavaScript and Swift, as well as optional parameters.
Minor Changes
- Fixed system rewriting h to H in ICUDateTime formats.
- Fix Yosemite NSSpeechSynthesizer bug that stops Speak Text working properly.
- Removed defunct Fix Finder Selection Bug fixed in Yosemite.
- Removed offline Help.
- Added SequentialConflictPalette hidden preference.
- Dropped the recording manual pause time from 1.0 down to 0.25 seconds.
- Increased the limit on Typed String triggers to 100 characters.
- Added hidden preference to stop mouse clicks from zapping the typed string buffer.
- When referencing applications or system preferences, references are stored relative to the home directory if appropriate.
- The actions list becomes focused when it is closed and contained the focus.
- Added DetailDisplayExtraStyle hidden preference.
- Added ReportUpdatesWhenEditorActivates hidden preference.
- Cut/Copy to Named Clipboard action waits until the clipboard changes.
- Use Notification Center instead of Growl for most notifications.
- Added hidden preferences to control Notification Center displays.
- Limit clipboard flavor sizes to 10MB (with hidden preference).
- Play various sounds as System Sounds so they honour the “Play sound effects” preference.
- Added accessibility support to Application and Window Switchers.
- Changed Conflict Palette to prefer alphabetical hot keys including digits over index hot keys.
- Changed MOD/AND/OR/etc to take precedence over variable names so Variable MOD Variable works.
Bug Fixes
- Fixed spelling of height in Get Image Size action.
- Fixed a possible race condition with “one action” macro palettes.
- Fixed a case where the “Must be unique” checkbox could be difficult to click.
- Restrict split view resizing to clicks that are near the divider.
- Corrected TRIGGERTIME() to be relative to 1970 epoch.
- Support lowercase pi character in calculations.
- Issues with shifted characters in emulators/remote desktops might be resolved.
- Handle surrogate pairs in non-edit/HTML displays.
- Fixed Macro Group Disabled/Enabled display toggle when many toggles happen quickly.
- Fixed a potential crash when looking for buttons in applications with poor accessibility support.
- Fixed an issue where the Execute Macro action could refuse to set the macro.
- Fixed flashing focus ring for text views.
- Fixed a possible crash when setting a hot key.
- Fixed %Screen%Front%, %Screen%Back%, %Screen%Back2%, %Screen%Mouse%.
Download
Download Keyboard Maestro now to try all these great capabilities. Or keep reading for even more details about the Features of Keyboard Maestro.
Alternatively, you can contact us if you have a question about whether Keyboard Maestro can solve your automation needs. We want all our customers to be satisfied, so we are happy to help you understand how Keyboard Maestro can achieve your automation goals.
Features
Keyboard Maestro is a productivity enhancer with several main functions. It allows you to:
- record and design your own macro shortcuts and activate them at any time.
- work with clipboard history using Clipboard History Switcher.
- work with an unlimited number of saved clipboards using Named Clipboard Switcher.
- navigate through running applications with Application Switcher and open windows with Window Switcher.
Macro Groups allow you to organize your macros. Think of them as folders of macros. Each Macro Group controls when the macros it contains are active. A Macro is made of two parts: a set of Triggers you choose to determine when the macro is executed and a list of Actions that define what the macro does when it is executed.
By creating macros, you can customize your Mac to suit your use, streamline tedious tasks, and remove opportunities for mistakes by automating repetitive jobs. Make a stuburnly difficult applications behvave the way you want them to; press a key and have the computer do the next minute worth of tedious tasks for you; type a few characters and have a page full of boilerplate text appear; and so much more. Soon you'll wonder how you could have used your Mac without Keyboard Maestro.
Here are some of the primary features of Keyboard Maestro.
General
- Sync your macros across multiple Macs using DropBox or other file sharing systems.
- Trigger macros by name.
- Full retina display support.
- Use the included Macro Debugger for detailed control of your macros in action.
Macro Groups
- Create Macro Groups, which contain Macros and control when they are active.
- Macro Groups can be restricted to or excluded from specific applications.
- Macro Groups can be restricted to or excluded from specific windows.
- Macro Groups can be activated or deactivated with hot keys, or via the status menu or global macro palette.
- Macro Groups can display a themed palette of contained macros.
- Macro Groups can be enabled or disabled.
- Customize the Macro Group icon by pasting an icon, or using the Icon Chooser and creator.
- If you are syncing your macros, Macro Groups can be disabled on specific Macs.
Triggers
- Macros can be triggered by one or more Macro Triggers using any number of the following:
- Hot Key trigger – when you press, hold, release or multi-tap a key.
- Macro Palette trigger – with a click on a context sensitive Macro Palette.
- Status Menu trigger – by selecting from a global system status menu.
- Typed String trigger – type a string of keys.
- Application trigger – on launch, quit, activate, deactivate, or periodically while an application is running or active.
- Clipboard trigger – when the system clipboard changes.
- Engine Launch trigger – when the Keyboard Maestro engine launches.
- Focused Window trigger – when the front/focused window changes.
- Login trigger – when you log in to your Mac.
- MIDI trigger – when a MIDI note is pressed or released.
- Mounted Volume trigger – when a volume is mounted or unmounted.
- Periodic trigger – periodically while logged in.
- Public Web trigger – over the Internet, explicitly to the public, or via authenticated log in.
- Sleep trigger – when the system goes to sleep.
- Time trigger – at a particular time of day.
- USB Device Key trigger – when you press, hold, release or multi-tap any HID (Human Interface Device) device key.
- USB Device trigger – when a USB device is attached or detached.
- Wake trigger – when the system wakes from sleep.
- Wireless Network trigger – when your Mac connects or disconnects to/from a wireless network.
- iPhone trigger – from your iPhone, iPod touch or iPad.
- Script trigger – from an AppleScript or other script.
- URL trigger – from an AppleScript or other script.
Actions
- You can create Macro Actions manually or by recording them.
- You can download or write your own Plug In Actions.
- Macros can execute a sequence of one or more Macro Actions including:
- Plug In Third Party Actions
- Application Control Actions
- Activate Last, Next or a specific application.
- Bring the current application's windows to the front.
- Quit All, Other, the current or a specific application.
- Hide All, Other, the current or a specific application.
- Show All or a specific application.
- Clipboard Actions
- Simulate Cut, Copy or Paste.
- Set the system clipboard to specific styled tokenized text.
- Set the system clipboard to a past copy of the clipboard.
- Set the system clipboard to a variable.
- Set the system clipboard to a Named Clipboard.
- Delete the current or a past clipboard entry from the clipboard history.
- Cut, Copy or Paste to/from a permanent Named Clipboard.
- Set a Named Clipboard to the system clipboard.
- Copy a Named Clipboard to another Named Clipboard.
- Apply styles (font, colors, underlines, etc) to a (portion of) the a clipboard.
- Apply a BBEdit Text Factory to the current clipboard.
- Apply various Filters to the contents of the current clipboard.
- Search and Replace a clipboard.
- Search a clipboard and extract information.
- Get a substring of a clipboard.
- Display a clipboard.
- Control the Flow and Behavior of a Macro
- Pause for a number of seconds (possibly calculated).
- Pause Until conditions are met.
- Execute a list of actions until conditions are met.
- Execute a list of actions while conditions are met.
- Repeat a list of actions a number (may be a calculation) of times.
- If conditions are met, execute a list of actions, otherwise execute another list.
- Execute another macro (like a subroutine).
- Cancel all, other, or this macro.
- Debugger Actions
- Start, finish, or toggle debugging.
- Have new macros begin paused, or run until paused.
- Breakpoint this, all, or other macros.
- Step over, into, or out of macros.
- Continue this or other macros.
- Note: debugging actions are not paused by the debugger.
- Mail Actions
- Send or create a mail message.
- Set a status flag on the currently selected mail message.
- Execution Actions
- Execute an AppleScript and optionally display or store the results.
- Execute a shell script and optionally display or store the results.
- Execute a Swift and optionally display or store the results.
- Execute a JavaScript for Automation (JXA) and optionally display or store the results.
- Execute an Automator workflow.
- Execute a JavaScript in the front Safari or Google Chrome window.
- Execute another macros (like a subroutine).
- File Actions
- Reveal a File.
- Move, rename, copy, duplicate, trash or delete a file.
- Read and write files (text, styled text or images).
- Append text to a file.
- Create a new folder.
- Read or write a file attribute (eg modification date).
- Read, set, add, remove or toggle Mavericks Tags.
- Safari and Google Chrome Actions
- Create a new window or tab.
- Move to the next, previous or a specific tab.
- Wait for the page to finish loading.
- Set the page URL or title.
- Focus or select a specific field.
- Read or write a specific field.
- Submit or reset a form.
- Execute a JavaScript in the front window.
- Image Actions
- Screen Capture an image.
- Find an image on the screen.
- Read and write an image file.
- Create a new image.
- Flip, rotate, resize, trim or crop an image.
- Composite a clipboard or styled text onto an image.
- Draw a shape onto an image.
- Display an image.
- Get an image size.
- Interface Control Actions
- Manipulate a window – resize, move, center, close, zoom, minimize, bring to front.
- Move or click the mouse with modifiers.
- Select or show a specific menu.
- Press a button with a specific name.
- Type a keystroke.
- Type a hardware key.
- Type a modifier key.
- Simulate moving the scroll wheel.
- Use a variable to set the mouse, window, or application.
- iTunes Actions
- Play a specific a specific song, a random song or a specific Playlist.
- Play, pause or stop.
- Rewind or fast forward.
- Go to the next or previous track.
- Raise, lower or set the volume to a specific level.
- Raise, lower or set the rating of the current song.
- Keyboard Maestro Actions
- Record a quick macro without launching Keyboard Maestro.
- Trigger a macro by name.
- Set (or toggle) whether a Macro Group or Macro is enabled.
- Activate a macro group (optionally with palette) for one or more actions.
- Cancel this, all, or other macros.
- Comment (no action, just for helping you document a macro sequence).
- Show, hide or toggle the Global Macro Palette.
- Mark a Macro (when displayed in a menu or palette).
- Set various delays used by Keyboard Maestro.
- Conceal macro palettes.
- Send a MIDI Note or Control Change.
- Notification Actions
- Display a Notification Center notification.
- Display a growl notification.
- Display text.
- Display large text.
- Display an alert, optionally stopping the macro.
- Prompt for user input in a variety of forms.
- Display a custom HTML form.
- Play a system beep.
- Play a sound.
- Speak some text.
- Highlight a location on the screen.
- Open Actions
- Open a file, folder, or application.
- Open the current Finder selection.
- Open a URL.
- Open a System Preferences pane.
- Open a 1Password bookmark.
- QuickTime Player Actions
- Play or pause the current movie.
- Step backward or forward.
- Increase, decrease or set the volume.
- Switcher Actions
- Activate the application launcher.
- Activate the application switcher.
- Activate the window switcher.
- Activate the named clipboard switcher.
- Activate the clipboard history switcher.
- System Control Actions
- Sleep, Restart, Shut Down, Fast User Switch or Log Out.
- Set the system “Find” pasteboard.
- Open/close the CD tray.
- Increase, decrease, set or mute/unmute the system volume.
- Increase or decrease the brightness.
- Start or stop the screen saver.
- Wake the screen.
- Set the system Network Location.
- Text Actions
- Insert text by typing or pasting with built-in token expansion.
- Display text with built-in token expansion.
- Type a keystroke.
- Set the clipboard to text.
- Set a variable to text.
- Apply styles (font, colors, underlines, etc) to a clipboard.
- Speak text.
- Variable Actions
- Set a variable to specific tokenized text.
- Set a variable to a calculation.
- Set a variable to a clipboard.
- Set a variable to a keychain password.
- Set a keychain password to a variable or text.
- Apply various Filters to the contents of a variable.
- Search and Replace a variable.
- Search a variable and extract information.
- Get a substring of a variable.
- Use a variable to set the mouse, window, or application.
- Prompt for user information to set a variety of variables.
- Web Actions
- Open a URL.
- Search the Web.
Editor
- Smart Groups
- Forward/Backward history of edited macros.
- History of triggered macros.
- Autocompletion.
- Integrated access to wiki help.
- Rename, color, group, and add notes to actions.
- Palette Theme Editor
Application Launcher
- Display a Cover Flow view of available applications for quick selection.
- Type ahead selection including abbreviations (eg “a p” for Adobe Photoshop).
Application and Window Switcher
- Optionally replace the system Command-Tab application switcher.
- Customize the switcher to match the look you want.
- Switch to any application or window with a keystroke.
- Switch to an application and hide all others.
- Easily select the exact application or window you want.
- Launch, hide, quit or force quit any application.
- Close or minimize any window.
- Quit (or force quit) and relaunch applications.
- Get Info or reveal applications.
- Choose the application ordering you want: alphabetically, by last use, or by launch order.
- Sort windows alphabetically or by window depth order.
- Optionally hide other applications.
- Optionally always hide other applications.
Clipboard Switcher
- An unlimited number of Named Clipboards.
- Copy, Cut or Paste to/from Named Clipboards using a single keystroke.
- Clipboards are saved permanently.
Clipboard History Switcher
- Never lose your clipboard again.
- Browse your past clipboards and paste any previous clipboard item.
- Send clipboard entries to other Macs.
- Clipboards display rich text and images.
- Use Quick Look to view clipboard entries.
- Set clipboard entries as favorites so they are always available in your clipboard history.
- Clipboard History is optionally saved across logins and restarts.
Purchase
Keyboard Maestro is engineered by Stairways Software Pty Ltd and distributed by FastSpring. Keyboard Maestro is licensed on a per-user basis and individual users may use it on up to five Macs.
New customers can purchase Keyboard Maestro for US$36 by choosing Purchase Keyboard Maestro from the Keyboard Maestro menu. Customers with five or more users should contact us for a volume discount quote.
Keyboard Maestro 7 is a paid upgrade for most users of previous versions. Existing users are eligible for a discount and can purchase an upgrade by choosing Purchase Keyboard Maestro Upgrade from the Keyboard Maestro menu.
Customers who purchased Keyboard Maestro after 1 January 2015 have been issued a free upgrade to Keyboard Maestro 7. If you have not received your free license, you can find your free license upgrade at https://enquiry.stairways.com/.
Customers who purchased Keyboard Maestro 6 prior to January 2015 can upgrade to Keyboard Maestro 7 for US$18 until 15 October 2015. After that date, or customers who purchased older versions of Keyboard Maestro can upgrade to Keyboard Maestro 7 for US$25. If you have not received your instructions on how to upgrade, you can find details by looking up your Keyboard Maestro license at https://enquiry.stairways.com/.
Customers who have not disabled upgrade emails have been emailed with new license or upgrade instructions as appropriate. If you have not received this email, please contact us so we can resolve this promptly.
It is our informal policy to have a paid major upgrade roughly once every 12 to 24 months. This allows us to have a reasonably consistent revenue stream with which to fund development of Keyboard Maestro, and ensures we are working as much for existing customers as to expand the customer base.
A fully-functional trial version of Keyboard Maestro is available for download from https://download.stairways.com/.
For sales enquires, customer service, technical support, or to contact project management, our current contact information is listed at https://contact.stairways.com/.
For more information about anything to do with Keyboard Maestro, visit https://www.keyboardmaestro.com/.
Screenshots
Here is a quick taste of what Keyboard Maestro offers.
Macros Window

Macro Editor

Macro Library

Icon Chooser

Palette Theme Editor

Macro Debugger

Application Switcher Window

Trigger Macro by Name

Clipboard History Switcher Window

Conflict Palette

Tour
This demonstration will begin to show you the power and versatility of Keyboard Maestro.
Getting Started
To start, launch Keyboard Maestro. It will initially display the Welcome window.

If you are new to Keyboard Maestro, start the tutorial and Keyboard Maestro will show you how easy it is to create a macro.
Close the Welcome window to display the Macros window.
You can see some example Macros we have included for you.
Make New Macro
Click the + button under the Macro column to add a macro and display the Macro Editor window. We will now design a complex Macro enabling you to save clippings to a text file. First, launch TextEdit and create a new empty document. Save this blank document as Clippings.rtf in your Documents folder.
Normally, to add a selection to the Clippings.rtf file, you would have to do all this:
- Press Command-C to copy the selection in an application.
- Go to the Finder, open your Documents folder, then open the Clippings.rtf file.
- Go to the end of the file in TextEdit.
- Press the Return key and type a line of dashes and return to separate the clippings.
- Press Command-V to paste the selection you made before.
- Save the file and close the document.
- Switch back to the application where you originally selected some text or a picture.
That is all very tedious, and probably explains why most people never even bother with such an operation.
So let’s define the whole sequence as a Macro.

Now any time you have some text you want to save, just select it and press F2 (or Fn-F2 depending on the state of the Use all F1, F2, etc. keys as standard function keys preference in the System Preferences). What used to be too much hassle to bother with is now done in seconds!
Named Clipboards
Keyboard Maestro lets you create as many named clipboards as you want using the Clipboards preference pane.

Named clipboards let you save frequently used information, like your company logo, timely information like a customer’s address, or your address so you never have to type it again. This allows you to paste the saved information whenever you want, wherever you want.
Then you can cut, copy or paste to/from the named clipboards using the defined Hot Keys (by default, Command-Shift-X, C and V respectively, but you can change them, too).

If you have a large screen, or a specific job that needs it, you can have the window stay open (by toggling the Close After Action button) and copy or paste named clipboards easily.
Clipboard History
For less permanent information, Keyboard Maestro automatically remembers your clipboard history, saving a copy of each new clipboard item as you copy it. You can then paste any previous clipboard using the defined Hot Key (by default, Command-Control-Shift-V).
Another advantage of the Clipboard History is you can leave the window open (by toggling the Close After Action button) and paste previous clipboards by simply double clicking the desired item. This is particularly helpful when you need to copy many items in many places to be pasted into one application. Hold down the shift key to paste without styles.
Keyboard Maestro can even save your clipboard history across restarts and log outs. Just enable the “Save Clipboard History to Disk” preference in the General preference pane.
Application Switcher
At the end of the Macro we defined, we used the Switch To Last Application action to switch back to the application you were using before. But most of us use a lot more than one application and we need to be able to switch between them, whether or not the application is already open. You can do more than just switch between applications with Keyboard Maestro: it lets you define applications that always appear when you are switching so you can launch them quickly, and also Excluded Applications that you never want to see. As well, you can quit, hide or show applications. The Application Switcher is activated like any other macro, so you can find it in the Switcher Group in the Macros window. By triggering the Application Switcher macro (for example by entering the default Command-Tab key trigger, though this can be changed) you can display the Application Switcher window.

Note the applications set to be launched or quit.
If you want a specific keystroke to always launch a certain application, you can define a Macro to do that. For example, you could create a Macro with a Hot Key Trigger of F3 so it always activates Safari.
Window Switcher
Keyboard Maestro also includes a Window Switcher. By triggering the Window Switcher macro (for example, by pressing Control-Tab), the Window Switcher window appears showing all the windows of current application (in the current space).

Note the windows set to be closed. This is a very useful way of cleaning up an application with a lot of open windows.
Conduct Your Mac Like a Pro!
This is just a taste of all that Keyboard Maestro can do for you. It’s time you started getting the most from your Mac? Download Keyboard Maestro today and you can be working faster and smarter in no time.
Links
Download Keyboard Maestro from https://download.stairways.com/.
Purchase Keyboard Maestro at https://purchase.stairways.com/.
Look up your current or previous license status and serial numbers, and get information about discounted upgrades from https://enquiry.stairways.com/.
Join the Keyboard Maestro Forum online community consisting of the developers and Keyboard Maestro users at https://forum.keyboardmaestro.com/.
Documentation describing Keyboard Maestro is available at https://documentation.keyboardmaestro.com/.
A wiki containing additional information, macros and other resources for Keyboard Maestro is available at https://wiki.keyboardmaestro.com/.
For sales enquires, customer service, technical support, or to contact project management, our current contact information is listed at https://contact.stairways.com/.
For more information about anything to do with Keyboard Maestro visit https://www.keyboardmaestro.com/.
Quick Start
Keyboard Maestro is easy to use once you understand the way the Editor and Engine, Macro Groups and Macros, Triggers and Actions work together.
By using these six things (Editor and Engine, Macro Groups and Macros, Triggers and Actions) together, you can dramatically enhance your Mac experience.
Just remember:
- If you want to make changes, use the Editor.
- If you want anything to work, make sure the Engine is running.
- If you want to control when a Macro is active, configure the Macro Group.
- If you want to control when a Macro is executed, configure its Triggers.
- If you want to control what a Macro does, configure its Actions.
Keyboard Maestro editor
The Keyboard Maestro application is the editor. It lets you create and modify macros and configure preferences. You use it only when you want to make changes and then you quit it. It does not always need to be running. Whenever you launch Keyboard Maestro, it also launches the Keyboard Maestro Engine which continues running until you log out (you can have the Keyboard Maestro Engine launched automatically when you login by enabling the “Launch Engine at Login” preference in the General preference pane).
Keyboard Maestro Engine
The Keyboard Maestro Engine is a background only application that enables all of Keyboard Maestro’s features. It responds to your Hot Key presses, watches the time, tracks applications and maintains your clipboard history, handles remote web, iPhone requests and receiving clipboards, and, of course, executes your Macro Actions. It should be running at all times, so we recommend you enable the “Launch Engine at Login” preference in the General preference pane.
Macro Groups
Keyboard Maestro allow you to organize your Macros into Macro Groups which are like folders of macros. Each Macro Group controls when the macros it contains are active. A Macro Group can target or exclude specific applications, which means the macros it contains will only be active in those desired applications. for example, you can have macros which are active only in Mail.app, or only in Mail.app when a compose window is open.
A Macro Group can also act as a container for specific-use macros which are enabled only when you specifically activate them. For example, you could create a Macro Group containing macros that resized or repositioned windows using the arrow keys, but those macros would only be active after the Hot Key was pressed so that the arrow keys could be used normally at other times.
Macro Groups can be displayed as palettes, allowing you to create your own custom toolbars which can be configured with a variety of themes.
You create a Macro Group by clicking the + button at the bottom of the Macro Groups list. You can disable or enable Macro Groups by clicking the ✓ button. You can configure a Macro Group by selecting it and clicking the Edit button, or by double-clicking on it.
You can also create Smart Groups, which are essentially saved searches and will show you any macros that match any of the set of search criteria.
Macros
Keyboard Maestro’s main purpose is to execute Macros. A Macro lives in a Macro Group and consists of a set of Triggers that determine when the macro is executed, together with a list of Actions that define what the macro does when it is executed. You create a Macro by clicking the + button at the bottom of the Macros list. You can disable or enable Macro Groups by clicking the ✓ button. Keep in mind that a Macro can only be active when the Macro Group that contains it is active. You can edit a Macro by selecting it and clicking the Edit button.
Triggers
A Trigger defines when a macro will be executed. There are a variety of Triggers available, the most common is the Hot Key trigger which executes the macro when a specified Hot Key is pressed. Similarly, you can use a Typed String trigger to execute a macro when you type some text (for example =addr=). Other common triggers are the Macro Palette which lets you trigger a macro by clicking on a context (front application) sensitive floating palette of macros and the Status Menu trigger which displays the macro in the Status Menu.
You can also trigger a macro when you login or when your Mac sleeps or wakes, at a specific time or on a specific day, when an application launches, activates or quits, by executing a script, or remotely using a web browser or iPhone. And you can trigger a macro when something changes, like a volume being mounted or unmounted, your wireless network connection changing, or a USB device being connected or disconnected.
A Trigger will only execute the macro if the Macro Group and Macro are enabled and currently active. You create Triggers by creating or editing a Macro and clicking the green ⊕ button at the bottom of the macro detail view.
Actions
When a Macro is Triggered it executes a list of Actions. Keyboard Maestro performs each of the Actions in order. There are a wide variety of Actions allowing you to control applications, simulate user interface events like key presses, mouse clicks and menu selections, work with files or images, control your Mac or the clipboard, or display a variety of powerful switchers (Application, Window, Clipboard and Clipboard History Switchers). You can also execute a script (AppleScript, Java, Swift, shell Script or Automator Workflow) or even download or create your own custom plug in actions. You create Actions by creating or editing a Macro and clicking the + button to display available actions, or by clicking on the Record button and performing the action while Keyboard Maestro records your actions to your Macro.
How do I ...?
How do I install Keyboard Maestro?
To install Keyboard Maestro, simply copy it to your Mac’s Applications folder (or anywhere you like).
When you launch Keyboard Maestro it launches an invisible “Keyboard Maestro Engine” that continues to run even after you quit Keyboard Maestro. The engine is the process that enables your Macros, Application Switcher, and Named Clipboard Switcher to work. This means that they will continue to work after you quit Keyboard Maestro, as long as the engine is still running.
You can quit or launch the engine manually using the File menu.
You should consider turning on the “Launch Engine at Login” preference in the General preference pane to ensure all of Keyboard Maestro’s facilities are available to you as soon as you login or startup your Mac.
How do I upgrade Keyboard Maestro?
Keyboard Maestro includes an automatic upgrade mechanism, so to upgrade Keyboard Maestro simply click the Install Update button when prompted.
To upgrade Keyboard Maestro manually, quit the engine by choosing Quit Engine from the File menu and the editor, and replace the Keyboard Maestro application in your Applications folder with the new one. Finally, launch Keyboard Maestro to restart the engine.
Keyboard Maestro will automatically import your previous version macros, clipboards and preferences. Your old macros will be saved in the ~/Library/Preferences/Keyboard Maestro/Keyboard Maestro Macros Saved Version 6.plist in case you decide not to upgrade to version 7 for any reason.
If you are upgrading directly from a much older version, you will get better results by upgrading to the last of each major version in turn, ie, run 2.1.3, then 3.5, then 4.3.2, then 5.3.2, then 6.4.8, then the current version. You can download old versions from our file archive.
If you have not done so already, you should consider turning on the “Launch Engine at Login” preference in the General preference pane to ensure all of Keyboard Maestro’s facilities are available to you as soon as you login or startup your Mac.
How do I purchase Keyboard Maestro?
New customers can purchase Keyboard Maestro for US$36 by choosing Purchase Keyboard Maestro from the Keyboard Maestro menu. Customers with five or more users should contact us for a volume discount quote.
You can look up your current or previous license status and serial numbers, and get information about discounted upgrades from https://enquiry.stairways.com/.
Thanks for supporting us and enabling us to continue work on Keyboard Maestro.
See also the Purchase section.
Can I purchase Keyboard Maestro from the Mac App Store?
Keyboard Maestro will not be available on the Mac App Store. Apple requires applications on the Mac App Store to be Sandboxed, and workflow applications like Keyboard Maestro cannot be sandboxed so it is excluded from the Mac App Store.
See also the Purchase section.
How do I register Keyboard Maestro?
When you purchase Keyboard Maestro you will be given a serial number, and will also promptly be emailed your username (email address) and serial number in the “Thanks For Your Purchase” email. Although you can retrieve this information from us at any time in the future, it is a good idea to keep this safe.
If you do not receive your serial number promptly after purchasing, it may be that the email has not reached you, possibly due to spam filtering on your email service. In this case, try looking up your purchase at https://enquiry.stairways.com/ (although that will email you your serial number which might again be lost to over-zealous spam filters).
Once you have your username (email address) and serial number, launch Keyboard Maestro and either immediately click the Use Existing License button or choose Register Keyboard Maestro from the Keyboard Maestro menu and then enter the username (email address) exactly as shown and the serial number exactly as shown and click the OK button. If you have any problems, recheck that the email address and serial number you are entering are exactly as shown (the serial number’s email address does not change even if you have changed your email address with us) and also that your license matches the major version number (eg, a version 7 license will work with version 7.x of Keyboard Maestro). If there is not Register Keyboard Maestro menu, it is because you have already registered this copy of Keyboard Maestro - choose About Keyboard Maestro from the Keyboard Maestro menu and check that the About box says you are registered.
How do I get started?
The first thing to do is to read the Quick Start and do the tutorial by choosing Tutorial from the Help menu. You may also want to subscribe to our Getting Started emails (Keyboard Maestro will ask you to subscribe or you can do that at your customer database page on our web site).
After that, use your Mac normally and keep an eye out for things you do repetitively. Things like:
- launch or switch to a particular application.
- open a particular document.
- type a specific string of text (eg your name, address, etc).
When you notice something, consider making a Macro to do it and assigning it to a Hot Key or a Macro Palette or Status Menu trigger.
Try to be consistent with your Hot Keys, for example you might have a set of applications you open, using a function key for each, and a set of documents you open, using a Control-Function Key combination for each of them, and a bunch of snippets of text your type, using Control-Letter for each of them (the letter could be a mnemonic to help you remember which one is which). Consider putting a sticker on your keyboard across the top of your function keys to help you remember which ones do which function. Remember that you can use the number pad keys as well.
Also, keep in mind common command keys and system defined hot keys and try to avoid conflicting with them.
See also the Tips section.
How do I create a new Macro?
If you have not done so, use the tutorial by choosing Tutorial from the Help menu to lead you through the process of creating a simple macro.
To create a Macro, launch Keyboard Maestro and select the Global Macro Group, then click the + button under the Macros list. Give the Macro a name, add one or more triggers, and one or more actions. The Macro is immediately active — you do not need to stop editing, quit the editor or anything else.
An easy way to generate macro actions is to turn on recording and proceed to show Keyboard Maestro what you want to do. Then turn recording back off and look through the actions — chances are you will want to delete or adjust some of the recorded actions to make a robust macro, but this will give you a quick start on creating the macro.
How do I find a Macro I've used or modified recently?
You can sort the macros by name, by trigger, by date created, modified or used. So if you launch Keyboard Maestro, select the All Macros pseudo group, and then choose Sort Macros by Date Modified from the View menu (or choose Sort Macros by Date Used from the View menu) to sort the recently modified (or used) macros to the top.
You can also click the ◷ button above the macro editor pane to select from recently modified macros, or use the ⌘ button to select from recently used macros.
How do I cancel a running Macro?
You can cancel all running macros by holding all the modifiers (Command, Control, Option, Shift) and clicking on the Keyboard Maestro Status Menu Icon.
You can cancel a specific macro by choosing Cancel from the Status Menu menu and selecting the macro. This is also a useful way of seeing what macros are currently running, if any.
You can also see and cancel macros by choosing Start Debugging from the Status Menu menu.
And finally, you can use the Cancel All Macros, Cancel Other Macros, Cancel This Macro, or Cancel Just This Macro actions.
How can I get the mouse coordinates on the screen or in a window?
If possible, you should avoid using mouse click actions. They tend to be very fragile, easily broken by subtle changes to the system or applications. And they also require the screen to be in the expected state, so you usually need to add a Pause action before them to ensure the item they are clicking on is where it is expected to be.
That said, you can use the Mouse Display window by choosing Mouse Display from the Window menu which will let you see the mouse coordinates relative to the window or main screen. Click the lock button to lock the display after a few seconds, and then put your mouse over the desired location. You can then change the relative corner, and click the Clipboard buttons to copy the coordinates.
Alternatively, you can simply record the click. Turn on recording in Keyboard Maestro, go to where you want to be, wait a couple seconds for the screen to be stabilised so the click will be relative to the front window, and click. Turn off recording, delete any extraneously recorded actions and you have your coordinates. Immediately after recording you can adjust the relative corner of the window or screen, and the recorded coordinates will adjust to match.
Remember that offsets are always to positive to the right and positive down, so if you are making a mouse click up from bottom edge of a window or screen, or left from the right edge of a window or screen, you will need to use negative coordinates.
How do I insert styled/colored text or images?
You can use the Insert Text action to insert styled text by pasting.
You can insert an image by copying it to the clipboard and then pasting it in using the Paste action (which just types the Command-V keystroke).
You can get your image from a Named Clipboard, or by reading an image file.
Here is how to create a Macro to insert an image when you press a Hot Key.
- Create a macro (see the How do I create a new Macro? section) with the Paste from Named Clipboard action.
- Select New from the clipboard popup menu, which will create a new named clipboard and show it in the Clipboards preference pane.
- Name the new clipboard “My Image”.
Name the macro, and assign it whatever trigger you desire.
Now whenever you trigger the macro you just created, your image will be pasted in.
How do I Insert the current date?
You can insert text using the Insert Text action, and it processes Tokens. There are some basic date format tokens (such as %LongDate%), or you can use the %ICUDateTime% Token with any ICU date format.
How do I get more than one Macro Palette (Toolbar)?
There are three kinds of palettes in Keyboard Maestro:
- There is one “Global Macro Palette” which includes any active macro that has the Macro Palette trigger. It appears whenever there is any active macro with the Macro Palette trigger. It shrinks to the size of an icon until you hover over it and then it expands to display the currently active macros with Macro Palette triggers. You can show and hide it using specific Macro Palette actions.
- Each Macro Group can be displayed as a palette. The macro group can be global to all applications, or specific to any subset of applications. It can be toggled on and off with a hot key (or a status menu selection or from the Global Macro Palette) or it can be displayed for a single action. Actions can hide or show the macro group palettes.
- When a hot key (or typed string or device key) conflicts (ie, triggers more than one macro), the Conflict Palette appears which lets you select from the conflicting macros. This can be an easy way to allow a single hot key to offer a multitude of similar actions. You can then use number keys or the mouse to select the desired hot key, or can use other keys to filter the palette until only one macro remains.
So to have more than one macro palette, create a macro group for each desired palette and configure it to show a palette as desired. Put your macros in there. Create as many of these as you like.The macros in such a macro group are only active while the palette is displayed, so if you only display it occasionally, especially only for one action, then they can have very simple hot keys (like plain letters for example).
You can control the order of macros in a macro palette (or the status menu) by prefixing their name with two characters and a closing parenthesis (eg “01)” - two characters and a closing bracket). The macros will be sorted based on the code, but the code will be stripped off before display in the palette (or status menu).
How do I use a multiple keystroke trigger?
You can assign the same hot key to multiple macros, and Keyboard Maestro will display a palette of the conflicting macros when you press that hot key allowing you to select the desired macro. You can select a macro from the palette using either number keys, or by typing the first distinct character to filter the macros down until only one is left. This is especially useful when you have a variety of similar or related tasks. You can also assign a hot key to a macro group which can activate it for one action (with or without a palette), and the contained macros can have whatever ”second” hot key you desire.
But Keyboard Maestro does not directly support assigning a two-keystroke hot key to a trigger. The problem with multiple keystroke triggers like Option-F R is what to do if you type Option-F A? Logic dictates that the Option-F A should go through to the system unimpeded, but Option-F R should be swallowed entirely. But this is impossible. The only way to do it would be to swallow the Option-F key, and then swallow the second key and then resubmit the Option F and the second key unless it matches Option-F R.
However, that is fraught with peril and cannot work robustly in the presence of other applications placing things on the keyboard event queue (or even a sufficiently fast typist).
For example, suppose you quickly typed Option-F A B. Keyboard Maestro would have swallowed the Option F and then the A, and then resubmitted it to the event queue, resulting in the stream of characters B, Option-F, A. There is no way to avoid this race condition, and as such Keyboard Maestro does not support any such mechanism.
As described above, Keyboard Maestro has a variety of ways you can use Option-F as a hot key that allows a second key to be used to select a macro. However in all cases it is clear that the Option-F has been used and there is no concept that the Option-F might come back later to do something else.
How do I configure the Application Switcher?
The Application Switcher (and all the switchers) are activated by macro actions. Keyboard Maestro creates a default “Switcher Group” Macro Group containing several macros, each macro has a hot key trigger and a matching action which activates the appropriate switcher.
So to configure the Application Switcher, launch Keyboard Maestro, select the Switcher Group, and double click the Activate Application Switcher macro. You can then configure the various Application Switcher parameters, such as style and icon size by configuring the Application Switcher action. You can also configure the hot key used to activate the switcher, or disable the switcher.
How do I backup / transfer my installation to another Mac?
If you are going to continue using both Macs, you should use Macro_Syncing rather than transferring your information. And indeed you can use Macro Syncing to transfer to a new Mac (even if both Macs wont be on at the same time as long as you preserve the sync file).
To transfer all your information to a new Mac you can copy the ~/Library/Application Support/Keyboard Maestro folder and optionally the ~/Library/Preferences/com.stairways.keyboardmaestro.* files to your new Mac. You can get to ~/Library in the Finder by holding down the option key and selecting Library from the Go menu.
Make sure that Keyboard Maestro and Keyboard Maestro Engine are not running on the source or target Mac when you transfer the folder. And make sure the resulting files and folders have the correct ownership and permissions.
If you copy the com.stairways.keyboardmaestro.* files, the new Mac will have the same MacUUID token and be considered the same Mac for syncing purposes, so you should not do this if you intend to continue using the old Mac.
How do I uninstall Keyboard Maestro?
Launch Keyboard Maestro and ensure the “Launch Engine at Login” preference in the General preference pane is turned off. Then choose Quit Engine from the File menu to quit the engine, and then choose Quit Keyboard Maestro from the Keyboard Maestro menu to quit the application.
You can then trash the Keyboard Maestro application from your Applications folder, as well as the preferences in the ~/Library/Application Support/Keyboard Maestro folder and ~/Library/Preferences/com.stairways.keyboardmaestro.* files and logs in the ~/Library/Logs/Keyboard Maestro folder.
How do I revert to a previous version of Keyboard Maestro?
Launch Keyboard Maestro and ensure the “Launch Engine at Login” preference in the General preference pane is turned off. Then choose Quit Engine from the File menu to quit the engine, and then choose Quit Keyboard Maestro from the Keyboard Maestro menu to quit the application. You can then trash the Keyboard Maestro application from your Applications folder.
For version 2, open the ~/Library/Preferences folder and the folder ~/Library/Preferences/Keyboard Maestro/Saved Version 2 folder. Move the files from the latter folder into the former folder. Trash the ~/Library/Preferences/Keyboard Maestro folder. Download Keyboard Maestro 2.1.3, if necessary, from https://files.stairways.com/keyboardmaestro/keyboardmaestro-213.dmg. Move Keyboard Maestro 2 to the Applications folder and launch it. Turn on the “Launch Engine at Login” preference if desired.
For version 3, open the ~/Library/Preferences/Keyboard Maestro folder. Trash the Keyboard Maestro Macros.plist and replace it with the Keyboard Maestro Macros Saved Version 6.plist. Download Keyboard Maestro 3.5, if necessary, from https://files.stairways.com/keyboardmaestro/keyboardmaestro-35.zip. Move Keyboard Maestro 3 to the Applications folder and launch it. Turn on the “Launch Engine at Login” preference if desired.
For version 4, open the ~/Library/Preferences/Keyboard Maestro folder. Trash the Keyboard Maestro Macros.plist and replace it with the Keyboard Maestro Macros Saved Version 6.plist. Download Keyboard Maestro 4.3.2, if necessary, from https://files.stairways.com/keyboardmaestro/keyboardmaestro-432.zip. Move Keyboard Maestro 4 to the Applications folder and launch it. Turn on the “Launch Engine at Login” preference if desired.
For version 5, open the ~/Library/Application Support/Keyboard Maestro folder. Trash the Keyboard Maestro Macros.plist and replace it with the Keyboard Maestro Macros Saved Version 6.plist. Download Keyboard Maestro 5.3.2, if necessary, from https://files.stairways.com/keyboardmaestro/keyboardmaestro-532.zip. Move Keyboard Maestro 5 to the Applications folder and launch it. Turn on the “Launch Engine at Login” preference if desired.
For version 6, open the ~/Library/Application Support/Keyboard Maestro folder. Trash the Keyboard Maestro Macros.plist and replace it with the Keyboard Maestro Macros Saved Version 6.plist. Download Keyboard Maestro 6.4.8, if necessary, from https://files.stairways.com/keyboardmaestro/keyboardmaestro-648.zip. Move Keyboard Maestro 6 to the Applications folder and launch it. Turn on the “Launch Engine at Login” preference if desired.
Macro Groups
Keyboard Maestro organizes your macros into Macro Groups which are like folders of macros. Each Macro Group contains a number of macros and controls when those macros are active.
A Macro Group can target or exclude specific applications, which means the macros it contains will only be active in those desired applications or when those applications are running. For example, you can have macros which are active only in Mail.app. It can also be active only in specific windows. So for example, you can have macros which are active only in Mail.app, or only in Mail.app when a compose window is open.
A Macro Group can also act as a container for specific-use macros which are enabled only when you specifically activate them. For example, you could create a Macro Group containing macros that resized or repositioned windows using the arrow keys, but those macros would only be active after the Hot Key was pressed so that the arrow keys could be used normally at other times.
Macro Groups can be displayed as palettes, allowing you to create your own custom toolbars which can be configured with a variety of themes and to appear under the mouse.
If you are syncing your macros with another Mac, Macro Groups can be disabled specifically on this Mac.
To create a new Macro Group, first launch Keyboard Maestro.
Now click the + button below the Macro Groups list.

Enter the name of your new Macro Group.
You can choose to target the macros in your Macro Group at specific applications.
By default, Macro Groups and their Macros are available in all applications, that is they are always ready to be triggered. These are especially useful for Macros that give you instant access to applications or documents, or type in globally applicable text. For example you might have a Macro to launch your email client or word processor, a Macro to open your financial accounts, and a macro to type your name or email address.
To have macros only active in specific applications, set the Macro Group to be “Available in the following applications” and add the desired applications to the list.
For example, you could have macros targeted at:
- Mail.app that insert common text messages.
- BBEdit and Xcode that insert code chunks or duplicate lines or add #include headers.
- Safari that configure windows or enter information.
- Photoshop or Acorn that arrange items or script guides.
To have macros active everywhere except specific applications, set the Macro Group to be “Available except in the following applications” and add the desired applications to the list. For example, you could exclude macros from triggering in games. Also, if you have an application that uses lots of function keys for crucial tasks, you could exclude that application to allow you to use the function keys for macros elsewhere without conflicting with that application.
You can restrict a macro to be active only in certain windows based on the window title.
You can also choose to activate the macros manually or display the macros in a floating macro palette. The options are:
- Always activated.
- Activated for one action when:
- Activated/deactivated when:
- Shows a palette for one action when:
- Shows/hides a palette when:
- Shows a palette until:
To have the macros in a Macro Group always ready to be triggered, set the Macro Group to be “Always activated”.
To have macros that are active only immediately after you trigger the Macro Group with no visible palette, set the Macro Group to be activated “Activated for one action when”. The macros in the Macro Group will be enabled when you trigger the Macro Group and will remain enabled until either any macro is triggered or you press any other key. You could use this to create a set of related actions with easily remembered hot keys that will not conflict with normal use because they are not activated until you trigger the group. For example, you could have a group of macros to launch various applications so that Command-Control-L activates the group and then a single letter press launched the application (eg M for Mail, S for Safari, F for Finder).
As with each of the following options, you can trigger the macro group by pressing a Hot Key, by selecting from the Status Menu, or by clicking on the global floating palette.
To have Macros that are remain active after you trigger the Macro Group, set the Macro Group to be “Activated/deactivated when”. The Macros in the Macro Group will be enabled when you trigger the Macro Group and will remain enabled until you dismiss the Macro Group by repeating the trigger. You could use this to create a set of related actions with easily remembered hot keys that will not conflict with normal use because they are not activated until you press the group Hot Key. For example, you could have a group of macros to move and resize windows and have Command-Control-W activate the group. Then a single arrow key press moves the front window. When the window is positioned, press Command-Control-W a second time to disable the macros.
To have Macros that are active and displayed in a macro palette only immediately after you trigger the Macro Group, set the Macro Group to “Shows a palette for one action when”. The Macros in the Macro Group will be displayed in a floating Macro Palette and enabled when you trigger the Macro Group and will remain displayed until either any macro is triggered or you press any other key. You could use this to create a set of related actions that do not even need a Hot Key. For example, you could have a group of macros to launch various applications like Mail, Safari and the Finder so when you press Command-Control-L, a palette of these macros is displayed and a single click on the desired application will launch the application.
To have Macros that are active and displayed in a macro palette after you trigger the Macro Group, set the Macro Group to “Shows/hides a palette when”. The Macros in the Macro Group will be displayed in a floating Macro Palette and enabled when you trigger the Macro Group and will remain displayed until you trigger the Macro Group again. You could use this to create a set of related actions that do not even need a Hot Key. For example, you could have a group of macros to align objects in a CAD application, so when you press Command-Control-A, a palette of these macros is displayed and you can click various alignment options (distribute left-right, align top edges) and then close the palette by pressing Command-Control-A a second time.
To have Macros that are always active and displayed in a palette, set the Macro Group to “Shows a palette until”. The Macros in the Macro Group will be displayed in a floating Macro Palette and enabled. The palette will close when (if) you trigger the Macro Group and will remain closed (and the macros disabled) until you trigger the Macro Group again. You could use this to create a set of related actions that do not even need a Hot Key and that are available in a Macro Palette. You could make the Macro Group available only in a specific application so that it appears only in that application. For example, you could have a group of macros to align objects in a CAD application, and have the Macro Group available (and hence the palette displayed) only in the CAD application.
Even if the macros are displayed in a Palette, the macros can still have Hot Key (or any other kind of) triggers which will be available whenever the macro group is active (in this case, whenever the palette is displayed).
You can disable or enable a macro group by selecting it and clicking the ✓ button at the bottom of the Groups list. If a Macro Group is disabled or inactive for any reason, all its contained Macros will be inactive. You can disable or enable a Macro Group using the Set Macro Enable action, you can show in a palette or activate a Macro Group using the Show Macro Group or Activate Macro Group actions.
You can change the targeting of an existing group by selecting it in the Groups list and clicking the Edit button, or by double clicking the macro group.
You can disable a Macro Group from AppleScript with:
tell application "Keyboard Maestro"
  setMacroEnable "Macro Group Name or UID" with/without enable
end tell
You can start editing a Macro or Macro Group from AppleScript with:
tell application "Keyboard Maestro"
  editMacro "Macro Group Name or UID"
end tell
You can get the list of currently selected macros or macro groups with:
tell application "Keyboard Maestro"
  selectedMacros
end tell
To delete a Macro Group, select the macro group and then press Command-Delete or click the - button at the bottom of the Groups list.
You cannot delete or rename or disable the Global Macro Group. If you want to control when some of the macros within the Global Macro Group are active, make a new macro group and drag those macros to it.
Smart Groups
You can create Smart Groups which let you see macros matching certain criteria by clicking the ⊕ button button at the bottom of the Groups column, and you can edit a smart group selecting it in the Groups list and clicking the Edit button, or by double clicking the Smart Group.
A Smart Group consists of a set of Search Strings, and any macro that matches any of the search strings will be listed in the Smart Group.
Macros
Macros are used to automate your workflow, procedure, or process on your Mac. Macros, also known as Shortcuts, are a way of improving your productivity by allowing you to perform repetitive or frequently required actions more quickly and accurately, tailoring your Mac to your usage patterns.
A Macro consists of:
- One or more Macro Triggers which define when the macro will be executed, if it is Active.
- A series of steps to execute called Macro Actions.
Macros are contained in Macro Groups, much like files are contained in folders. The Macro Group determines when the Macro is Active (available to be triggered). Macro Groups control such things as which applications the Macro will be active in.
A simple example of a Macro is one which has:
- A Single Hot Key trigger, such as ⌃E
- A single action like Insert Text by Pasting the text “SomeName@SomeDomain.com”
- Is in the “Global Macro Group”, making it available to all applications.
Macros can do almost anything you can do manually on your Mac, and much that you can't, like running scripts.
How To Create a Macro
To create a Macro, first launch Keyboard Maestro, select the desired Macro Group to contain it, and then click the + button below the Macros list. To edit a Macro, double click it, or select it and press the Edit button. The Macro Editor window will be displayed.

Enter the name of your new Macro (you can skip this and it will be named for you based on the action you select).
You can create a new trigger by clicking on the green ⊕ button. There are several Macro Triggers to choose from, the most common being the Hot Key trigger which allows you to execute the Macro at the press of a key. You can define several different triggers, and any of the triggers will execute the Macro Actions. You can delete a trigger by clicking the red ⊖ button.
You can add a new action by clicking the New Action button or the + button at the bottom of the macro detail view to display the list of actions or by choosing Insert Action By Name from the Edit menu or choosing Insert Action from the Edit menu. There are many Macro Actions to choose from. The actions you include will be executed in order. You can reorder the actions by dragging them around. You can copy actions by Option-Dragging or by using Copy and Paste. You can delete an action by selecting it and pressing the Delete key. You can enable or disable actions by selecting them and clicking the ✓ button at the bottom of the macro detail view.
An easy way to generate macro actions is to turn on recording by clicking the Record button at the bottom of the macro detail view and proceeding to show Keyboard Maestro what you want to do. Then turn recording back off and look through the actions. Chances are you will need to delete or adjust some of the recorded actions to make a robust macro, but this will be quicker than creating each action manually.
Macros are continuously saved, so the macro is live as soon as it is created. It will be available immediately (subject to the restrictions of the Macro Group it is contained in). There is no need to turn off editing, switch to a different macro, or quit the editor (although quitting the editor after you have finished editing all your macros is a good idea).
You can select a macro by clicking on the ⌘ button to select a recently triggered macro or click the ◷ button to select from recently modified macros.
You can share a macro to the Keyboard Maestro Forum, or to a friend via Mail or Messages using the sharing button at the top of the Macros window.
You can disable or enable a macro by selecting it and clicking the ✓ button at the bottom of the Macros list. You can also disable or enable a Macro using the Set Macro Enable action, or from AppleScript with:
tell application "Keyboard Maestro"
  setMacroEnable "Macro Name or UID" with/without enable
end tell
You can start editing a Macro or Macro Group from AppleScript with:
tell application "Keyboard Maestro"
  editMacro "Macro Group Name or UID"
end tell
How to Run a Macro
In order to run (execute or trigger) a macro must be active:
- It is enabled
- It’s containing Macro Group is enabled
- It’s containing Macro Group meets all its activation criteria.
Activation/Deactivation or a Macro Group is a dynamic process, automatically set by the Keyboard Maestro Engine as your Mac's environment changes in real time. For details, see Macro Activation
You run a macro by invoking one of its triggers.
You execute a macro’s action sequence by invoking one of its Macro Triggers that you have defined (such as pressing a hot key if you have configured a hot key trigger). For some triggers, no action is required on your part. For example, the macro could be triggered at a specific time, or what a specific USB device is attached.
You can also trigger macros by name using the Trigger Macro by Name action, which in turn can be in a macro and triggered any way you desire.
You can trigger a macro using the kmtrigger: scheme with a URL like kmtrigger://macro=MacroName&value=Value (the value is accessible via the %TriggerValue% Text Token).
If the web server is enabled for remote access, you can trigger a macro remotely after logging in using a web browser or the Keyboard Maestro Control iPhone application.
You can also trigger a macro using AppleScript or another scripting language (select the “Or by script” entry to display script code in various languages such as AppleScript or Perl).
Note that the web server needs to be separately enabled in the Web Server preference pane, and all macros are subject to the restrictions of the Macro Group they are contained in. If the Macro Group is not enabled and active, the macro will not be available.
How to Import Macros
You may want to import Macro(s) you have downloaded from other sources, like the Keyboard Maestro Forum.
You may use any of the following to import the macro file (.kmmacros):
- Double-click on the macro file in the Mac Finder
- In the Keyboard Maestro app, goto File > Import Macros… and select the macro file
- In some browsers, click on the downloaded file icon at the bottom of the browser window
![]() Note that the macro file (
Note that the macro file (.kmmacros) may contain one or more macros, and will also create the Macro Group if it does not exist in your configuration. Otherwise, it will put the Macro in your existing Macro Group.
Import Macros in Safe Mode
⚠️ You should be aware that the macros will be imported in the same state (enabled/disabled), triggers, and macro group that they were saved in. This could result in the imported Macro being triggered (executed) as soon as it is imported. If you are at all uncertain about the source of the macros, hold all the modifiers (Command, Control, Option, Shift) down when importing the macros and the macro will be imported disabled.
See also the Macro Groups, Macro Actions, Macro Triggers, Macro_Activation, Macro Examples, Macro Library and Recording sections.
Macro Triggers
A Macro is executed when any of its Macro Triggers is activated. There are several triggers to choose from, the most common being a Hot key, that is a Macro is executed in response to a keystroke, usually in conjunction with one or more modifier keys. You can also trigger a macro by typing a string. Or you can display a Macro Group as a floating palette, or execute macros remotely via the built-in web server.
Hold the option key down while adding a new trigger to get help on that trigger.
You can also trigger macros by name using the Trigger Macro by Name action, which in turn can be in a macro and triggered any way you desire.
The Hot Key trigger is perhaps the most common and most basic of all triggers. When you press the configured keyboard key, the system swallows the keystroke, and Keyboard Maestro executes the macro.
The Typed String trigger is also very common, it lets you execute a macro in response to a sequence of keys like an abbreviation.
The Macro Palette trigger lets you add your macro to a floating palette, so you can trigger it by clicking on the macro name in the palette.
The Status Menu trigger lets you add your macro to the Keyboard Maestro status menu so you can trigger it by selecting the macro name from the status menu.
You can learn more about the available triggers on the wiki Triggers page.
Macro Actions
A Macro executes a sequence of Macro Actions in order. There are many actions to choose from. Some simple actions, such as Sleep Computer, require no other information and simply do their job, while other more complex actions, such as Select Menu Item, require you to specify more information, such as a target application or menu name. You do this by editing the values for the action. Keyboard Maestro actions have two very distinct types of fields: text fields and numeric fields. You can learn more on the wiki Text Fields page.
There are many powerful Macro Actions available for your use, and you can sequence them together to perform complex tasks.
To add an action, edit your macro, click the New Action button, or equivalently the + button below the detail view. This will show the lists of possible actions.
To see all actions, select the All Actions category. To select just your favorite actions, select the Favorites category. You can drag actions into your Favorites category. To see plug in actions that you have added to Keyboard Maestro, select the Third Party Plug Ins category.
Double click or drag one or more of the actions to add them to the action list for the currently edited macro.
Alternatively, choose Insert Action by Name from the Edit menu and quickly search for and add an action by name, or select an action from the Insert Action command in the Edit menu.
You can enable or disable actions by selecting them and clicking the ✓ button at the bottom of the macro detail view. You can set the timeout or other options on an action clicking the ⚙ button at the top right of the action and selecting an option.
You can display more or less detail about some actions by clicking the disclosure triangle. You can disclose all the actions (in a sublist) simultaneously by option clicking on the disclosure triangle.
You can try the action immediately by clicking the ⚙ button at the top right of the action and selecting Try. Alternatively, you can try the selected actions immediately by clicking the Try button at the bottom of the macro detail view.
You can control or right-click on an action to act on it, including pasting other actions above or below it.
You can configure the action using the various menus and text fields, as well as by clicking the ⚙ button and using the action menu. This allows you to rename actions, color them, add notes, configure their time out and failure behaviour and more. The action menu also allows you to get help on the specific action.
In Keyboard Maestro, there are two kinds of processed fields in actions, text token fields and numeric calculation fields. Most text fields are text token fields. Most numeric fields are calculation fields. These behave very differently.
You can share an action sequence to the Keyboard Maestro Forum, or to a friend via Mail or Messages using the sharing button at the top of the Macros window.
You can learn more about the available actions on the wiki Actions page.
Macro Syncing
Keyboard Maestro is licensed on a per user basis on up to five Macs, so if you use it on two or more Macs you may want to transfer some of your macros from one to the other. You can do this by selecting the desired macros and choosing Export Macros from the File menu to export your macros, and then importing them on the target Mac.
Alternatively, you may want (almost) all your macros on both Macs, in which case you can set up your macros to sync between them. This means any change you make on one Mac will be mirrored on the other and vice versa, although you generally should not edit your macros simultaneously on both Macs.
NOTE: You can only sync between identical versions of Keyboard Maestro. If the sync file is newer than the current version, you will be warned to upgrade, turn off syncing, or live dangerously (which temporarily disables syncing and allows you to make changes that will likely cause trouble later).
To do this, you need a file location that is mirrored on both Macs. DropBox or a similar service is good for this, or you can use a shared file server, although you must ensure it is available at all times to both Macs.
You are then ready to start syncing your macros.
WARNING: Syncing macros is an all or nothing affair, so any macros on the target Mac before you start syncing will be lost.
WARNING: If you make changes on one Mac, and then make changes on the other Mac before syncing has taken place, you may lose one or other changes. Be especially careful if you are working with your Mac when offline.
WARNING: Keyboard Maestro references to files or applications that exist on one Mac and not the other will likely cause problems, so you should ensure any application you reference on one Mac is available at the same path on both Macs.
On the Mac that currently has your macros, choose Start Syncing Macros from the File menu. Read the text carefully, and then click the Create New button. Save your existing macros in the macro sync file in your shared location. From now on, Keyboard Maestro will sync any changes to/from that file.
Wait for the file to be mirrored to the second/target Mac. On that second Mac, choose Start Syncing Macros from the File menu. Again, Read the text carefully, and then click the Open Existing button.
WARNING: All of the existing macros on this second Mac will be destroyed if you continue. If you have any macros on the second Mac that you wish to preserve, export them first, and then after syncing is enabled, import them (and they will then be synced to your other Macs).
Select the mirrored sync file. Your existing macros will be replaced with the macros from your first Mac.
Repeat the process for any other Macs.
If there are some macros you do not want active on a Mac, you can configure any given Macro Group to be disabled on that particular Mac by turning on the Disabled on this Mac setting in that Macro Group.
DropBox may keep backup versions, and Keyboard Maestro keeps backup revisions (in the Revert Macros command in the File menu), so you should be able to recover from any conflicts that happen. DropBox may notice a conflict if you edit your macros on both Macs simultaneously. As a general rule this should not be an issue, though you may lose a change if you make changes on both Macs quickly (and note that quitting the Keyboard Maestro editor is considered a change).
Since your two Macs will likely not be identical, you may have to adjust your macros to work properly on both Macs. Using the various Tokens and functions can help. For example the %MacUUID% is a unique ID for each Mac, and can be used to test which Mac the macro is running on. Other tokens, like the %SCREEN% token can be used to ensure your macro behaves appropriately regardless of the details of the Mac.
Note: Only your macros are synced. None of your preferences, clipboards or variables are synced.
Macro Debugger
Keyboard Maestro includes a built-in macro debugger which you can turn on by choosing Start Debugging from the Status Menu menu or by using one of the Debugger actions. This will display the Macro Debugger window.
Once debugging, you can control whether new macros start paused or start running.
The macro debugger shows all running macros, and what action they are currently executing (including showing nested actions).
Using the associated buttons, you can:
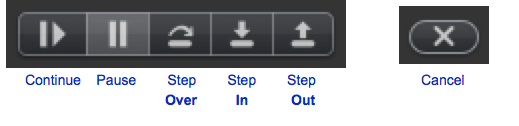
- Continue the macro – allowing it to run until completion, or until it hits a Debugger Breakpoint action.
- Pause the macro.
- Step Over the current action, including any subactions.
- Step In To the current action, stepping in to any included subaction.
- Step Out Of the current action and any other actions at the same level.
- Cancel the macro.
For detailed instructions, see How to debug a macro.
All the debugger actions can also be done via the Debugger actions.
Keep in mind that once a macro has started executing, the engine has taken a copy of the macro to execute, so any changes you make in the editor will not affect the execution of the macro (although any changes you make to a sub macro that has not yet started executing would apply).
Also keep in mind that macros can often be time sensitive, so if you find your macro runs fine when stepped through in the debugger, but not when run normally, the issue is probably that the macro is executing actions like click actions before the system has caught up and the screen is stable. Add an appropriate Pause action if that is the case.
If you close the debugger window, the paused macros will resume their normal operation.
Variables
Keyboard Maestro includes permanently stored variables that you can use or set in many actions, as well as in Calculations or Tokens which can be used in almost any field in Keyboard Maestro.
Variable names must start with a letter, and then can contain letters, numbers, spaces, or underscores. Variable names are case insensitive, but their case is remembered. Variable names should not include a function or operator name with spaces around it (eg “ MOD ” , so “A MOD B” would not be a valid variable, although “MODULE” would be fine).
Variables with names that start or end with “Password” or “PW” are considered passwords – their values will not be stored (except in memory) and they cannot be read directly by shell scripts or AppleScripts, though their consequences can easily be extracted, eg with the Set Clipboard to Text action. The Prompt For User Input dialog will display such variables in a password field.
Variable values are text, but they can contain comma separated numbers, and can then be accessed as arrays (eg Variable Name[1]). Mouse positions, window frames and the like can then be stored and manipulated in variables, and you can access the fields with “struct” like forms like Variable Name.width (field names include: x, y, left, right, top, bottom, width, height, midx, midy, and fuzz).
Variables values can be accessed from shell scripts or JavaScript for Applications via environment variables, and from AppleScript via environment variables or using AppleScript commands to the Keyboard Maestro Engine, and from JavaScript using the document.kmvar dictionary, see the Scripting section.
You can also set a variable value to %Delete% to avoid having it show up in variable popup menus. This is also a good idea to do after a variable has contained sensitive information (like a password) or a large value (like a file or web page contents).
There are various variables used by Keyboard Maestro to convey information, including:
| Alert Button | the name of the button clicked in an alert |
| Result Button | the name of the button clicked in a Prompt For User Input dialog |
Note that these variables can easily be overwritten by other actions, so you need to use caution when depending on them.
The following special variables were:
| Mounted Volume Name | replaced by the %TriggerValue% token |
| Mouse Click Result | replaced by the %ActionResult% token |
| Press Button Result | replaced by the %ActionResult% token |
| Select Menu Result | replaced by the %ActionResult% token |
| USB Device Name | replaced by the %TriggerValue% token |
You can add a variable to an action using the Variable command in the Insert Function sub-menu in the Edit menu or Variable command in the Insert Token sub-menu in the Edit menu, or by selecting from the popup menu next to some variable fields, or by using Type Completion.
Variables are created on demand, but you can add, delete, see or change variables in the Variables preference pane, and you can read and write variables from AppleScript, see the Scripting section.
Filters
Keyboard Maestro includes a variety of filters that can be applied to either the system clipboard, Named Clipboards, or variables. For clipboards, the filters preserve style information to whatever degree is possible. Use either the Filter Variable action or Filter Clipboard action to apply filters.
The filters are:
- Remove Styles (ie, make the clipboard plain text – not applicable to variables).
- Set line endings to Mac, Unix or Windows/DOS.
- Trim Whitespace.
- Hard wrap or unwrap paragraphs.
- Lowercase (all characters), Lowercase First (just the first character).
- Uppercase (all characters), Uppercase First (just the first character).
- Capitalize (all words) or Title Case (intelligently uppercase certain first letters).
- Change quotes to Smart, Dumb or French quotation marks.
- Encode HTML or non-ASCII HTML entities.
- Decode HTML entities.
- Generate an HTML list.
- Percent Encode or Decode a URL.
- Quote for AppleScript, JavaScript, Shell (bash) Script, or Swift.
- Get or delete the last path component or the path extension.
- Get the basename of the path (ie the name without directory or extension).
- Expand tilde (~) paths, or abbreviate with a tilde.
- Resolve symlinks, or standardize the path.
- Delete or bullet (•) control characters.
- Calculate an expression and return the result, see the Calculations section.
- Process Tokens and return the result, see the Tokens section.
- Get the value of a named variable or named clipboard.
- Count the characters, words or lines and return the result.
We will likely expand the list of possible filters, so if you have specific filtering needs that you think might be of general interest, please let us know. In the mean time, remember that you can apply scripted filters using an AppleScript or shell script, for example the shell script:
pbpaste | perl -pe 'tr/A-Z/a-z/' | pbcopy
is roughly equivalent to the Lowercase filter, except that it only works with ASCII characters.
Tokens
Tokens allow you to add textual information to token text fields. You can insert tokens into a field using the Insert Token popup near the field or by choosing Insert Token from the Edit menu. You can also start typing a token and use type completion to complete the token.
The available tokens are listed on the wiki Tokens page.
Text token fields also process %NN% or %NNNN% as arbitrary hex unicode characters (eg %41% is an A), and (except for regular expression fields) process backslashed characters \a,\b,\e,\f,\t,\r,\n (bell,backspace,escape,form feed,tab,return,line feed).
To include a percent in your text, simply double the percent (%%). To include a backslash \ in your text, double the backslash (\\).
Calculations
Overview
Keyboard Maestro supports calculations in almost any numeric text fields. For example you can Pause for “60*Time in Minute”s. Calculations can also use comma separated lists of numbers as arrays, and can return such arrays, so you can operate on frames and points.
Examples
This is Pseudo Code Representing KM Actions
Set variable ‘Temp’ To Text ‘%WindowFrame%1%’
Set variable ‘Temp’ To Calculation ‘Temp.x+Temp.width/2,Temp.y+Temp.height/2’
Use ‘Temp’ to Set the Mouse Location
will result in the mouse being placed at the center of the front window.
Note: You must use commas for this purpose, and full stops (.) for decimal numbers, and never use any thousands separators, regardless of your desired language.
Expressions
Keyboard Maestro’s expressions include precedence, nested bracketed expressions, many built-in functions, various numeric bases, so you should be able to write almost any expressions you might like to use, as well as use it as a general purpose calculator if desired.
Operators
Operators based on precedence from lowest to highest are:
| array separator (,) | separates elements of an array |
| ternary operator (?) | a=b ? 3 : 4 |
| bitwise or (|), bitwise and (&) and bitwise xor | operators |
| comparison operators (<, ≤, =, >, ≥, ≠) | compare for (in)equality and return 0 or 1 |
| shift operators (≪, ≫) | shift a number left or right |
| addition operators (+, -) | add or subtract |
| multiplication operators (*, /, MOD) | multiply, divide or Modulo |
| power operator (^) | exponentiation |
| unary prefix operators (√ (Option-V), -, brackets) | square root, negation, sub-expressions |
| functions | a large variety of functions |
| numbers and variables or array accesses (5,$5A,0x50,8#007,Variable,Variable[5]) | identifiers and values |
| unary postfix operators (!,%,° (Option-Shift-8)) | factorial, percent, degrees |
To minimize conflict with variables, operators and functions must be in uppercase.
Functions
The available functions are listed on the wiki Functions page.
Screen Coordinates
Keyboard Maestro refers to screen coordinates as two or four comma separated numbers in the text of a Keyboard Maestro Variable (which is always a string).
- Screen object points, like the left,top position of a window, with two values, like 12,34
- Screen object rectangles, like the frame of a window, have four values 12,34,56,78 (with a fifth value for fuzz in some instances).
* You can reference these values by position in the string, as it the Variable were an array: - For example:
if the VariablemyWindowis “12,34,56,78”
then all of these forms of reference will provide a value of 34 in a Calculation field:- myWindow[2]
- myWindow.Y
- myWindow.Top
Variable Dot Notation
In a Calculation field you can reference the numbers in a Keyboard Maestro Variable (which is always a string) using dot notation:
(The Variable Name and Dot reference are case insensitive.)
| Variable.x | x coordinate |
| Variable.y | y coordinate |
| Variable.left | the left coordinate of a rectangle |
| Variable.top | the top coordinate of a rectangle |
| Variable.right | the right coordinate of a rectangle |
| Variable.bottom | the right coordinate of a rectangle |
| Variable.width | the width of a rectangle or size |
| Variable.height | the height of a rectangle or size |
| Variable.fuzz | the fuzz of an image match (rectangle,fuzz) |
| Variable.MidX | the horizontal middle of a rectangle |
| Variable.MidY | the vertical middle of a rectangle |
Examples of Variable Data Reference
Macro Actions
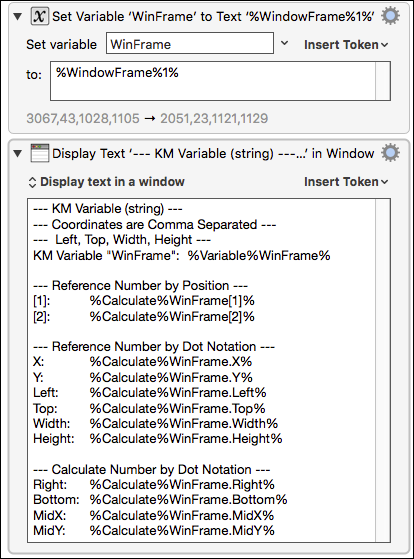
Example Results
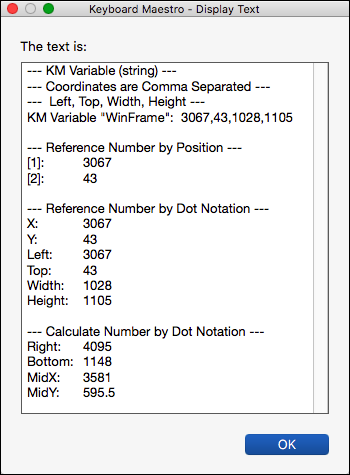
Some example expressions might be:
Amount in Dollars * 100
MJD() > 55928
NOW() > TIME(2012,3,23,12,2,1)
DOW(TIME(2012,4,4)) = 4
Radius*SIN(20°),Radius*COS(20°)
Window Frame[1]+Window Frame[3]/2,Window Frame.MidY
MOUSEBUTTON() + 2 * MOUSEBUTTON(4)
SCREEN(Internal,Left,10%)
Conditions
Keyboard Maestro includes a variety of control flow actions which perform actions depending on a set of conditions.
The condition clause of the flow control actions can be any of:
- Any of the following are true – at least one condition must be true.
- All of the following are true – every condition must be true.
- None of the following are true – no condition is true.
- Not all of the following are true – at least one condition must be false.
This is followed by a set of specific conditions. If there are no conditions in the set at all, the action will not execute anything except the Until action which will execute the actions once. Neither side of the If Then Else will execute.
The available conditions are listed on the wiki Conditions page.
See also the Variables and Calculations sections.
Collections
Keyboard Maestro includes a For Each action which perform a sequence of actions repeatedly, once for each element of a collection.
Any time you have to deal with a set of things (lines, files, numbers, etc), you are probably thinking of a collection for which the For Each action is the answer.
The available collections are listed on the wiki Collections page.
Search Strings
Search Strings are filters which, in addition to the text you type, can include qualifiers that may be applied to searches for Macros and Actions in:
- Keyboard Maestro Editor, Search field
- Keyboard Maestro Editor, Smart Group
Keyboard Maestro will search for the text you type, and all of the below qualifiers that you specify, for matches in your list of macros. Each word is searched for separately (and in any order) unless you quote a phrase.
Note that the Trigger Macro by Name Action only searches among active macros.
Search Qualifiers:
The qualifier can generally be shorted to its shortest unique name, as shown in the Short Form column.
| Qualifier | Short form | Definition | Example |
|---|---|---|---|
| all: | al: | Match everything | al:(Otherwise the empty search string matches nothing) |
| group: | gr: | Match any macro within the named macro group (Use quotes if Name contains spaces) | gr:"Forum Examples" |
| global: | gl: | Match any macro within any macro group that is globally active | gl:(aka universal:) |
| application | ap: | Match any macro that is specific to (or excluded from) the specified application | ap:Finder |
| enabled: | e: | Match any macro that is enabled | e:(not necessarily active) |
| disabled: | d: | Match any macro that is disabled | d: |
| trigger: | t: | Match any macro that has a trigger matching the specified string | t:;sig(Typed String of “;sig”) |
| hotkey: | h: | Match any macro with specified HotKey Match any macro with any HotKey if no HotKey is specified. Modifier Keys must be one of these: ⌃⌥⇧⌘ | h:⌘⌃C(CMD CTRL C) h:(Matches any HotKey) |
| name: | n: | Match any macro that has a name matching the specified string | n:PDF |
Palettes
Keyboard Maestro can display a number of Palettes (or Toolbars).
There are three types of palettes:
- Global Macro Palette
- Macro Group palettes
- Conflict Palette.
Global Macro Palette
Any macro with the Macro Palette trigger will be displayed in the Global Floating Palette. This palette appears whenever there is one or more active macros with this trigger, so it may appear and disappear depending on which macros are active (remember that Macro Groups control when a macro is active).
Macro Group Palette
Any Macro Group can be configured to display as a palette. Since Macro Groups can be active in specific applications, this can be used for application-specific palettes.
Conflict Palette
When you use a trigger (hot key, device key, or typed string trigger) that is assigned to more than one macro, and all of these macros are active, then Keyboard Maestro will display the Conflict Palette listing the triggered macros and let you select the desired macro, either by clicking on it or by typing a letter that narrows that palette down until only one macro remains at which point that macro is triggered. You can use the Conflict Palette to limit the number of hot keys you need to remember by give a bunch of similar or related macros the same hot key and then selecting the desired macro with a further keystroke based on the now visible palette.
Controlling The Display of Palettes
By using the Show Macro Group or Show Macro Group for One Action actions, you can display a macro group as a palette. This allows you to build nested palettes. For example, a palette could contain a number of macros that simply show different macro groups.
By using the Mark or Unmark Macro action, you can have macros shown in macro palettes appear ticked to indicate some state (for example an application dock that marks or unmarks the macro as the application launches or quits). Alternatively, you can enable and disable macros to have them appear or disappear from a macro palette. Either of these techniques will allow some level of dynamic behaviour of palettes.
You can control the appearance of the palettes in the Palettes preference pane or in the macro group configuration. You can choose the style, the opacity of the palette, the size of the entries, the number of columns, whether the entries include the icon, the text and/or the trigger, and whether the palette shrinks when the mouse is not over it. You can use the styling to build palettes that just display their icon for example, and combined with custom icons for your macros this can create a nice looking icon palette.
Recording
Keyboard Maestro has the ability to create macro action sequences by recording your actions.
For example, to create a macro that simulates keystrokes, rather than create each macro action individually you can enable recording and then simply type the keystrokes.
Keyboard Maestro can record the following actions:
- Moving a window
- Resizing a window
- Miniaturizing a window
- Clicking the mouse
- Typing a Keystroke
- Moving the scroll wheel
- Selecting a menu
- Activating an application
- Quitting an application
There are two ways you can use recording: when creating or editing a macro, or via a Record Quick Macro action.
When you are creating or editing a macro, with the Macro Editor window displayed, simply click the Record button. After a short pause for you to get ready, recording will begin. To avoid the pause, hold the option key down while clicking the Record button).
Once recording starts, demonstrate the task you would like to perform using any of the above actions and Keyboard Maestro will record your actions directly into your macro.
While Keyboard Maestro is recording, it will display the Recording window.

While you are recording, you can pause the recording by clicking the Pause button in the recording window, and you can add a 0.25 second pause to your macro by clicking the Clock button.
When you are finished, click the Record button again to stop recording, or you can stop all recording by clicking on the Recording window.
Typically you will need to make a few adjustments to the Macro Actions to ensure the macro will operate robustly when used. Generally, use recording to create a base sequence of actions and then adjust as necessary.
The other way to use recording is via a Record Quick Macro action. When triggered, the Record Quick Macro immediately starts recording your actions into a private macro. When you have demonstrated the sequence of actions you want, trigger the Record Quick Macro action again. The sequence can now be executed via the specified Hot Key or the Status Menu or Macro Palette. For example, if the Record Quick Macro is triggered by pressing Control-F1, and the specified Hot Key is Option-F1, then if you typed:
Control-F1, h, e, l, l, o, Control-F1
Then each time you press Option-F1, Keyboard Maestro will type “hello” for you. One common use for this is if you want to adjust a sequence of lines in a systematic way. For example, if you had a list of colors, and wanted to change them in to a list of constants, say from this:
color Red
color Green
color Blue
to
const int kRed = "Red";
const int kGreen = "Green";
const int kBlue = "kBlue";
You could do this with grep and regular expression, replacing “color (.*)” with “const int k\1 = “\1”;”, which is fine if you can remember how to do grep with regular expressions, whether it is \1 or $1, and whether the application you are in supports regular expressions or not. But perhaps a simpler way is to just show Keyboard Maestro how to do the first line and then let it do the others with a single keystroke each.
So move the cursor to the start of the first line, press Control-F1, then the sequence:
Option-Shift-Right Arrow, Delete, Forward Delete, Command-Shift-Right Arrow, Command-X, c, o, n, s, t, <space>, i, n, t, <space>, k, Command-V, =, ", Command-V, ", ;.
Finish with Command-Left Arrow, Down Arrow to carefully put the cursor at the start of the next line. Now press Control-F1 again to finish the recording, and Option-F1 twice to translate the next two lines.
Record Quick Macros can record the same set of actions that normal recording can, however because you cannot see or edit the recorded actions it is wise to keep them simple, preferably just a sequence of keystrokes. Typically, recorded Quick Macros will be used immediately and not reused, but they are saved and remain available until you record over them.
Macro Library
The macro library is a place where we can provide you with a variety of ready-made macros for optional addition to your macros. You can download new potential macros from us or from friends or colleagues. You can also share your own macros with other Keyboard Maestro users by exporting your clever macros as a library item.
Keep in mind that macros can do practically anything on your Mac, including cause a huge amount of damage, so you should never execute a macro without verifying the source and better yet, checking exactly what it does.
To use the library, choose Macro Library from the Window menu to display the macro library. You can then look through the available macros and insert any you'd like to use into your macros. You can then use them as is, or configure the new macros, perhaps changing the hot keys or adjusting the macros to your liking.
Each macro comes with a short description to tell you what it does, so scroll through them to see all the possibilities, and click on them to get more details.
You can export a set of macros to a macro library file, which you can share with others, and you can import .kmlibrary files into your macro library. Note that currently there is no way to delete imported macro library entries from your Macro Library except by quitting Keyboard Maestro and Keyboard Maestro Engine and removing the files from the ~/Library/Application Support/Keyboard Maestro/Keyboard Maestro Libraries folder.
For some other example macros, you can also look at the Macro Library on the wiki.
Macro Examples
A typical simple Macro consists of a single Hot Key trigger, such as Control-A, together with a single action, such as the Insert Text by Typing Action that will “type my address” .
For some real examples, see the forum topics:
You can also use the Macro Library by choosing Macro Library from the Window menu to see some build in examples.
Here are a number of example and suggestions for Macros to give you some ideas of how you can get the most out of Keyboard Maestro and your Mac. For tips on how to remember which Hot Key executes which action, see the Remembering Macro Hot Keys section.
Launch Your Most Used Applications
Use function keys to launch or switch to your most used applications. For example, you probably often switch to the Finder, your Email client, your Web Browser, your Word Processor. Consider putting these and other frequently used applications on function keys.
Open Your Most Used Documents
Use Control-Function Keys to open your most used documents. For example, you might have a documentation file or financial details file that you access frequently, consider putting these on Control-Function Keys.
Insert Text Templates
Use Control-Letter and the Insert Text action to type in text for you, such as your name, address, phone number, and so on. Consider restricting these to just the appropriate applications like your Email client or Word Processor by creating a Macro Group for them. Also consider using Typed String triggers for these sorts of macros, for example “=em=” for email address and “=addr=” for address. The text you insert can be typed, pasted as plain text, or can be fully styled text.
Use Hot Keys to Open Financial Accounts
If you keep your finances on your computer, then you probably need to open a document every time you enter a bill or receive a statement. By creating a Hot Key to open the document for you, you can save a few seconds every time – at least it might make receiving a bill slightly less unpleasant! If you have multiple accounts (eg personal, business, association) then this can be even more useful.
Use Hot Keys to Connect to SSH or FTP sites
You could use Hot Keys to connect to your common servers. You might need to create a Bookmark file for the site and use the Open File Macro Action.
Simulate Bookmarks
Use the browser actions to open web pages, fill in fields, submit forms, follow links. For example, you could use this to log in to the city library for all the members of your family, one in each tab, to easily check what books are due back.
If you are going to use this to enter passwords, use the Set Variable to Keychain Password action to retrieve the password so that it is not stored in plain text in the Keyboard Maestro macros.
Remap Command Keys
If you find yourself pressing a command key in an application and expecting it to do something but it does not work (for example, Command-T for “Replace and Find Again”), use a Macro to make the command key “do the right thing” in that application. Similarly, if you use a function in an application frequently, but it has a convoluted command key or no command key at all, define your own command key by using a Hot Key to select the menu item.
Keep in mind that you can do some menu key remapping in the System Preferences Keyboard preference.
Simulate Missing Features
If you find yourself missing a feature in one application that you are used to in another application (perhaps you switched email clients and a feature is missing), see if you can simulate the feature with a sequence of commands and then use a Hot Key for that. For example, Close Window, Down Arrow, Return to move to next email message, or Command-Left Arrow, Shift-Down Arrow, Command-C, Down Arrow, Command-V to duplicate a line.
Swap Characters
If you often type characters out of order, use a Hot Key to swap them by first placing the cursor between them and then executing:
- Simulate Keystroke Shift-Right Arrow
- Cut to Named Clipboard “Temp”
- Simulate Keystroke Left Arrow
- Paste from Named Clipboard “Temp”
Save a Text Clipping
If you often want to save snippets of text, you could create a Hot Key to save a clipping:
- Copy
- Open File “Clippings.rtf”
- Simulate Keystroke Command-Down Arrow
- Insert Text “== %LongDate% %ShortTime% ==<return>” by Typing
- Paste
- Simulate Keystroke Return
- Simulate Keystroke Return
- Select Menu Item File » Save
- Manipulate Window Close Front Window
- Switch to Last Application (or Quit Specific Application or Command-Q)
Delayed Click
Setup a macro which simply pauses for twenty seconds and then clicks the mouse. Then when you need to print on to an envelope, go all the way through the process, position the mouse over the Print button, execute the Macro, walk over to the printer, insert an envelope and then take the printed envelope back with you.
Insert Boilerplate Text
If you regularly need to insert boilerplate text (eg copyright or file creation text), use an Insert Text macro to insert the text quickly and easily. It can even expand tokens to insert the date or other information.
Apply Text Conversions
If you are regularly translating text from one format to another in an automatic process, perhaps you can automate the whole thing with a Keyboard Maestro macro. For example, converting function declaration in a header file into function definition.
Simulate Workspaces
Create a macro to setup an application to your liking. For example, create multiple tabs in Terminal, each in its own directory, or open multiple documents in TextEdit, each positioned and sized appropriately.
Setup an Application When Launched
If you always do a set of things every time you launch an application (eg arrange the windows in a particular way), use an application Macro Trigger to execute a Macro when you launch the application, then have the Macro do the work for you.
Clean Up After Using an Application
If you always do something after quitting an application (eg unmount a server or disconnect from the Internet), use an application Macro Trigger to execute a Macro when you quit the application. You might need to do a little AppleScripting to perform the action and then use the Execute an AppleScript action.
Launch Scanner Application When Scanner is Connected
Set up a macro that automatically launches your scanner application when your scanner is connected, and quits it again when the scanner is disconnected. This works brilliantly with the ScanSnap scanners – open the lid and the scanner software launches, close it and the scanner software disappears.
Switch Network Location When You Connect
Set up a macro that automatically changes your Network Location when you connect to your home or work wireless network.
Feedback During Macro Execution
A Macro can play a System Beep, but an alternative is to use an AppleScript or shell script to speak text (AppleScript say “hello”).
You can also use the Alert action to display a window with specified text. This also allows you to stop the macro if you decide not to proceed.
Rakesh Kumar’s PC Switcher’s Pack
Rakesh Kumar has created a pack to make life easier for Windows to Mac Switchers. It includes a set of macros for Mail, Microsoft Word and Microsoft PowerPoint as well as macros to map control keys to command keys for various common actions like Cut/Copy/Paste. It also includes a DefaultKeyBinding.dict for Mail to make it work more like Windows users expect.
Download Rakesh Kumar’s PC Switcher Pack and follow the instructions.
Icon Chooser
Keyboard Maestro includes an Icon Chooser and creator to allow you to select custom icons for your macro groups and macros.
You can display the Icon Chooser by choosing Icon Chooser from the Window menu.
Click on an image well for a macro or macro group (in Edit mode), and then click on an icon in the Icon Chooser to select it.
The Icon Chooser includes three panes with different icons:
- Internal – all the icons Keyboard Maestro normally uses.
- Applications – all the icons Keyboard Maestro can find on your Mac.
- Character – icons you create based on a character.
The Character Icon Choose pane allows you to create your own custom icons by setting a few simple parameters.

You can set the background and foreground color, shape, and an optional character:

When you have a Macro or Macro Group icon well selected, and you make any change in the Icon Chooser, or if you click the icon in the Icon Chooser, then the icon for the Macro/Macro Group will be set.
To load the Icon Chooser from an existing Macro or Macro Group, select the icon well of the Macro/Macro Group and then open the Icon Chooser (close it first if necessary).
If not icon well is selected when you open the Icon Chooser then it will retain the settings that were last used.
Note that icons configured from the Icon Chooser will be very small in storage size in your macros. ⚠️ Icons set any other way (including copy & paste from another icon) will be much larger.
To transfer an Icon Chooser created icon from one macro to another, use this process:
- Close the Icon Chooser if it is open.
- Select the source icon well.
- Open the Icon Chooser - it will take on the characteristics of the source icon.
- Select the target icon well.
- Click on the icon in the Icon Chooser.
Application Launcher
The Activate Application Launcher action is essentially a highly specialized macro action that enables you to launch applications. By triggering the macro, the Application Launcher enables you to launch any applications in your Applications or Utilities folder, as well as any recently running applications. Once the launching window appears, you may select the application to launch, and Application Launcher will launch it for you.
The applications are also listed in the Status Menu, so you can launch applications that way if you prefer.
By default, Keyboard Maestro creates a Activate Application Launcher macro in the “Switcher Group” Macro Group, triggered by Command-Control-Tab. You can disable this Macro by selecting the Switcher Group, then selecting the Activate Application Switcher macro and clicking the ✓ button below the Macros list. You can edit this macro to change the trigger to any other desired Hot Key.
Application Switcher
The Activate Application Switcher action is essentially a highly specialized macro action that enables you to launch, switch, hide, and quit applications. By triggering the macro, the Application Switcher enables you to switch between all running applications. Once the switching window appears, you may select the application to activate, and Application Switcher will take you to it.
The Activate Application Switcher action lets you choose from three themes (vertical list, horizontal icons, or icon grid), as well as configure the icon size, color tint, and the sort order.
You can also choose to hide other applications when switching (Keyboard Maestro also has a preference in the General preference pane to always hide other applications when switching).
You can select various applications to always be displayed, even if they are not currently running, perfect for launching frequently used applications. In the Excluded preference pane, you can configure various applications to never be displayed.
While the Application Switcher window is displayed, you can perform various actions:
- Press “q” to mark (or unmark) an application to be quit.
- Press “k” twice to mark an application to be force quit.
- Press “s” or “h” to mark (or unmark) an application to be hidden.
- Press “l” or “z” to mark (or unmark) an application to be launched.
- Press “a” to hide (or show) “always included” applications.
- Press “e” to show (or hide) “always ignored” applications.
- Press “j” to show (or hide) “recently quit” applications.
- Press “c” to select the current application.
- Press “f” to select the Finder.
- Press “d” to switch directly to the current application and hide other applications.
- Press “i” to Get Info on the current application.
- Press “r” to reveal the current application in the Finder.
If you click and hold down on any icon, a menu with these options will appear. Using the menu, you can also configure the switcher to:
- switch just the front window instead of all windows.
- reopen windows when switching.
By default, Keyboard Maestro creates a Activate Application Switcher macro in the “Switcher Group” Macro Group, triggered by Command-Tab. You can disable this Macro by selecting the Switcher Group, then selecting the Activate Application Switcher macro and clicking the ✓ button below the Macros list. You can edit this macro to change the trigger to to any other desired Hot Key avoid replacing the system application switcher.
Window Switcher
Activate Window Switcher is essentially a highly specialized macro action that enables you to show, hide, and minimize windows. By triggering the macro, Window Switcher enables you to switch between all open windows in the current application. Once the switching window appears, you may select the window to activate, and Window Switcher will bring it to the front.
While the Window Switcher window is displayed, you can perform various actions:
- Press “q” to mark (or unmark) a window to be closed.
- Press “s” to mark (or unmark) a window to be minimized.
- Press left or right arrow keys to scroll through applications.

By default, Keyboard Maestro creates a Activate Window Switcher macro in the “Switcher Group” Macro Group, triggered by Control-Tab. You can disable this Macro by selecting the Switcher Group, then selecting the Window Switcher macro and and clicking the ✓ button below the Macros list.
Named Clipboard Switcher
The Named Clipboard Switcher enables you to define any number of named clipboards which can be use to Cut or Copy into and Paste from in any application. To use the Named Clipboard Switcher you simply trigger the Named Clipboard Switcher macro. The Named Clipboard Switcher will present you with a window allowing you to select the named clipboard to use.
You can press arrow keys to scroll through the clipboard entries, or you can use type-ahead to select a named clipboard, and you can use the search field to filter the clipboards.
You can cut or copy the current selection into the selected clipboard, or paste the selected clipboard into the current selection (hold down the shift key to paste as plain text).
By default, Keyboard Maestro creates three Named Clipboard Switcher macros in the “Switcher Group” Macro Group, triggered by Command-Shift-X, C and V (Cut, Copy and Paste). You can disable the Macros by selecting the Switcher Group, then selecting the macros and and clicking the ✓ button below the Macros list.
You can add or delete named clipboards in the Clipboards preference pane.
Clipboard History Switcher
Clipboard History Switcher saves a copy of each clipboard every time you copy something. You can then paste any previous system clipboard by triggering the Clipboard History Switcher macro. Clipboard History Switcher will present you with a window allowing you to select any of the past clipboard and paste them.
You can press arrow keys to scroll through the clipboard entries, and return/enter to paste in an entry. Hold the Shift key while pressing return or double clicking to paste as plain text.
You can use the search field to filter the clipboards.
You can mark entries as favorites, in which case they will never be removed from the clipboard history.
Clipboard entries that resemble passwords are obscured, deleted after they reach position ten in the clipboard history, and not saved to disk. You can option click on an obscured password to reveal it.
You can send clipboards to another Mac running Keyboard Maestro. The received clipboard entries will appear in the clipboard history (assuming the Keyboard Maestro Web Server is enabled on the destination Mac).
By default, Keyboard Maestro creates a Clipboard History Switcher macro in the “Switcher Group” Macro Group, triggered by Command-Control-Shift-V. You can disable the Macros by selecting them in the Macros window pane and clicking the ✓ button.
Keyboard Maestro also has many macros in the Macro Library, such as macros for Paste Plain Text (Command-Shift-V) and Paste Previous Clipboard (Command-Control-V).
Preferences
To configure Keyboard Maestro, first launch Keyboard Maestro and choose Preferences from the Keyboard Maestro menu.

The preferences are divided into sections.
General Preferences
In the General preference pane you can:
- enable or disable launching the Keyboard Maestro Engine at Login.
- configure whether to always hide other applications when switching applications.
- configure whether to always show the status menu.
- configure whether to detect clipboards that resemble passwords and obscure them.
- configure the style of the status menu.
- configure whether to include applications in the status menu.
- configure whether to save the recent applications between logins.
- configure whether to save the clipboard history between logins.
Palettes Preferences
In the Palettes preference pane you can adjust the style of the default palette, the Global Macro Palette, and the Conflict Palette.
You can also configure the Conflict Palette to be placed under the mouse or to have it remain where you place it.
Web Server Preferences
In the Web Server preference pane you can:
- enable or disable the web server.
- configure the username, password and port of the web server.
- enable or disable web browser access.
- enable or disable iPhone access.
- enable or disable receiving clipboard entries.
- enable or disable replacing the current clipboard.
- access the web server in your default browser by clicking on Connect.
The web server is disabled by default.
If the web server and web browsing are enabled, then anyone who can connect to your Mac can execute any macro that has a Public Web trigger.
If the web server and web browsing are enabled, and if you have configured a username and password, then anyone who can connect to your Mac and login with the specified username and password can execute any of your macros.
If the web server and iPhone access are enabled, and if you have configured a username and password, then anyone who can connect to your Mac from an iPhone and login with the specified username and password can execute any of your macros.
If the web server and receiving clipboard are enabled, then anyone can send you clipboards which will appear in your clipboard history. By default they do not overwrite the current clipboard, but you can enable that to allow the current clipboard to be directly written remotely.
Macros are still only available when they are enabled and their containing macro group is enabled and active.
You can configure custom styles using the defaults write command to add a custom style, for example:
defaults write com.stairways.keyboardmaestro.editor WebServerCustomStyles -string 'body { background: green; }'
This might be useful if you are controlling multiple Macs and want to differentiate them more clearly.
Clipboards Preferences
In the Clipboards preference pane you can add, remove and rename Named Clipboards and see and change their values.
Named Clipboards store snippets or text or images (or anything the clipboard can hold) and you can copy or paste from them using the Clipboard Switcher or using appropriate macro actions.
You can paste an image into a Named Clipboard by selecting it in the list and pasting an image (if you select part of the text, it will paste the image into the styled text, which works but is probably not what you want).
Variables Preferences
In the Variables preference pane you can add and remove variables and see and change their values.
Excluded Preferences
In the Excluded preference pane you can add and remove applications from the global excluded applications list. Excluded applications will not be shown in the Application Switcher, and are (optionally) not hidden or quit by the Hide All Applications or Quit All Applications actions.
Other Hidden Preferences
You can configure various preferences using defaults write from the Mac OS X Terminal. Some preferences will take effect immediately, but others may require the editor or engine to be relaunched.
You can set the maximum number of items in the clipboard history (default 200)
defaults write com.stairways.keyboardmaestro.engine MaxClipboardHistory -int 200
You can set the maximum position of concealed (password) items in the clipboard history (default 10)
defaults write com.stairways.keyboardmaestro.engine MaxConcealedPosition -int 10
You can set the maximum clipboard flavor size (default 100MB)
defaults write com.stairways.keyboardmaestro.engine ClipboardFlavorMaximumSize -int 100000000
You can set a regular expression which matches text you think should or should not be concealed as passwords.
defaults write com.stairways.keyboardmaestro.engine LooksLikePassword "^[a-zA-Z0-9]+$"
defaults write com.stairways.keyboardmaestro.engine LooksLikeNotPassword "^[a-zA-Z0-9]+$"
You can set the command line tool that is used to execute AppleScripts
defaults write com.stairways.keyboardmaestro.engine OSAScriptCommand "/usr/bin/arch -i386 /usr/bin/osascript"
You can set the AppleScript name of the Safari application, as well as the name of the Safari browser shown in applications:
defaults write com.stairways.keyboardmaestro.engine AppleScriptSafariName "Safari Technology Preview"
defaults write com.stairways.keyboardmaestro.engine BrowserSafariName "Safari Tech"
or
defaults write com.stairways.keyboardmaestro.engine AppleScriptSafariName "/Applications/Safari.app"
Similarly for Google Chrome:
defaults write com.stairways.keyboardmaestro.engine AppleScriptGoogleChromeName "Google Chrome Canary"
defaults write com.stairways.keyboardmaestro.engine BrowserGoogleChromeName "Chrome Canary"
The AppleScript name is used in AppleScript's which control the respective browser in the form of tell app “<browser name>”. Note that the Safari browser must still behave like Safari, and the Chrome browser must behave like Chrome, or the actions will not work. Do not bother trying to set them to Firefox or something like that as it will not work. All this allows you to do is select a specific version of Safari or Chrome respectively.
You can disable Shift-Space from clearing the Typed String buffer
defaults write com.stairways.keyboardmaestro.engine TypedStringResetWithShiftSpace -bool NO
and you can disable clicks from clearing the Typed String buffer
defaults write com.stairways.keyboardmaestro.engine TypedStringClearWithMouse -bool NO
and you can set the idle time for clearing the Typed String buffer (default 5 seconds)
defaults write com.stairways.keyboardmaestro.engine TypedStringClearTime -float 5.0
You can disable all animation in the editor with:
defaults write com.stairways.keyboardmaestro.editor DisableAnimation -bool YES
or the engine with:
defaults write com.stairways.keyboardmaestro.engine DisableAnimation -bool YES
You can silence the clipboard transfer sounds with:
defaults write com.stairways.keyboardmaestro.engine SilenceClipboardSounds -bool YES
And you can silence the recording sounds with:
defaults write com.stairways.keyboardmaestro.engine SilenceRecordingSounds -bool YES
And you can disable the Macro Group Enabled/Disabled toggle with:
defaults write com.stairways.keyboardmaestro.engine SilentlyToggleMacroGroups -bool YES
You can adjust the recording delay with:
defaults write com.stairways.keyboardmaestro.engine RecordingCountDown -int 5
Note: you can option click the Record button to avoid the delay.
You can adjust the get mouse location delay with:
defaults write com.stairways.keyboardmaestro.editor MouseGetCountdown -int 5
You can have the conflict palette use sequential hot keys from the first letter with:
defaults write com.stairways.keyboardmaestro.engine SequentialConflictPalette -bool YES
You can configure the timing of a “tap” (Hot Key and USB Device Key triggers) with:
defaults write com.stairways.keyboardmaestro.engine MaxTapDownTime -float 1.0
defaults write com.stairways.keyboardmaestro.engine MaxTapUpTime -float 1.0
The default allowable down time is the double click interval, and the default allowable up time is twice the double click interval.
You can set configure whether the Status Menu includes the Paste submenu and how many items it includes with:
defaults write com.stairways.keyboardmaestro.engine StatusMenuIncludePaste -bool NO
defaults write com.stairways.keyboardmaestro.engine StatusMenuPasteCount -int 30
You can set configure Display Large text color and display period with:
defaults write com.stairways.keyboardmaestro.engine DisplayLargeTextColor -string "502033"
defaults write com.stairways.keyboardmaestro.engine DisplayLargeTextDisplayPeriod -float 5.0
You can configure a custom palette theme color style with:
defaults write com.stairways.keyboardmaestro.engine CustomPaletteTheme "0,90,74, 110,90,74, 256,90,74"
The style includes 3 or 6 HSB colors (being background, text, highlighted letter, selected background, selected text, selected highlight letter) each specified as hue,saturation,brightness. The background brightness is dropped by 33%, but if there are only three colors, then the selected background color is the background without the 33% drop. You can select the Custom style in the Theme Editor.
By default recorded clicks do not restore the mouse location, but you can change that with:
defaults write com.stairways.keyboardmaestro.engine RecordedClickRestoresMouseLocation -bool NO
You can control which notifications are displayed with:
defaults write com.stairways.keyboardmaestro.engine "Notification-Information" -bool NO
defaults write com.stairways.keyboardmaestro.engine "Notification-Macro Execution" -bool NO
defaults write com.stairways.keyboardmaestro.engine "Notification-Macro Cancelled" -bool YES
defaults write com.stairways.keyboardmaestro.engine "Notification-Action Failed" -bool YES
defaults write com.stairways.keyboardmaestro.engine "Notification-Received Clipboard" -bool YES
You can have new versions reported only when the editor activates with:
defaults write com.stairways.keyboardmaestro.engine ReportUpdatesWhenEditorActivates -bool YES
You can adjust the spelling of Favorites with:
defaults write com.stairways.keyboardmaestro.editor FavoritesDisplayName "Favourites"
You can turn off automatic completion with:
defaults write com.stairways.keyboardmaestro.editor AutomaticCompletion -bool NO
You can limit the maximum undo stack size in the editor with (default 200MB):
defaults write com.stairways.keyboardmaestro.editor MaximumUndoSize -int 200000000
You can add some custom styling to the detail view displays with:
defaults write com.stairways.keyboardmaestro.editor DetailDisplayExtraStyle -string 'div.ActionComment div.UserText { font-family:"Monaco"; }'
You can set your preferred first day of the week (1=Sunday, 7=Saturday):
defaults write com.stairways.keyboardmaestro.editor FirstDayOfWeek -int 2
You can enable the WebKit inspector with:
defaults write com.stairways.keyboardmaestro.engine WebKitDeveloperExtras TRUE
Then you can control-click on elements and use Inspect Element and get an inspector window, including a Console tab.
Scripting
Executing Scripts
The following Execute Script Actions are provided to execute a variety of script languages:
You can specify the script to be executed either by reference to a file or as text entered directly in the Execute Action. After pasting or typing script text into the Execute Script Action, press the Enter key to compile and format the script.
For example, the Execute_an_AppleScript Action:
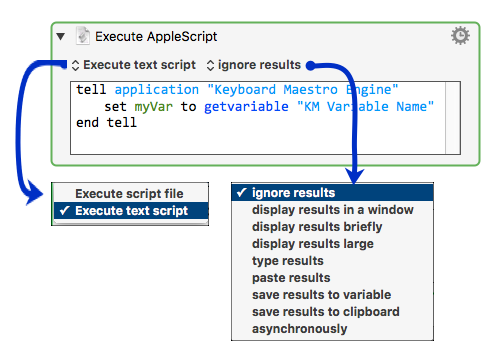
Getting Script Results
The results of scripts can be displayed, or they can be typed or pasted in to the current application document, or saved into a Keyboard Maestro Variable or the System Clipboard. This allows you to insert text that depends on many factors, such as date calculations, file listings, SQL queries, web pages, or anything else you can imagine. Alternatively, the results can be displayed in Notification Center, in a window, or in large type across the screen. Or you can ignore the results, or execute the script asynchronously, leaving it running in the background.
Using the Clipboard
You can also read and set the clipboard in a script, although the easiest way to set the clipboard to the results of a script is to select the Execute Script Action option to “save results to clipboard”. This works only for plain text returned by the script. For more complex formats, you will need to set the Clipboard directly in the script.
For more information about using the Clipboard in scripts, see:
Automating Applications and Adding Functionality to Keyboard Maestro
AppleScripts, JavaScript for Automation scripts, Shell scripts, and Swift scripts, give you a powerful way of adding new facilities we have not specifically provided for, as well as controlling other applications.
Web Page Interactions
JavaScript in a Browser Actions (Google Chrome and Safari) enables deep control over a web page, as well as extracting specific data from both the page contents and HTML.
Shell Scripts
Shell scripts can execute any installed scripting language, such as perl, python, ruby or whatever. Be aware that because shell scripts are executed in a non-interactive shell, typically none of the shell configuration files (like .login or .profile) will be executed, which may change the way the shell script behaves.
Variables can be accessed from shell scripts via the environment variables in the form $KMVAR_Variable_Name where KMVAR_ is prefixed, and spaces are converted to underscores. AppleScripts can also access the environment variables using the system attribute command, but note that system attribute is not safe for international characters.
Note that the total size of the variables stored in the environment is limited to 100K, so larger variables may be excluded to ensure the variables do not take up excessive amounts of environment space since this is limited by the system.
Variables whose names start with “ENV_” override regular environment variables (eg “ENV_PATH” overrides the regular “PATH” environment variable).
AppleScript
For most recent methods and examples, see Using AppleScript to Get and Set Keyboard Maestro Variables
Get or Set Variables Using Version 7.1+
Keyboard Maestro 7.1+ Provides the Most Compact Methods of Using AppleScript
tell application "Keyboard Maestro Engine"
  --- GET VARIABLE ---
  -- IF KM Variable does NOT exist, the AS Variable will be set to empty string --
  set calcResult to getvariable "Calculation Result"

  --- SET VARIABLE ---
  -- IF KM Variable does NOT exist, it will be created --
  setvariable "Calculation Result" to (calcResult + 10)
end tell
For AppleScripts compatible with prior versions of Keyboard Maestro, see Using AppleScript with Ver 6+.
JXA
JavaScript for Automation (JXA) can access Variables with:
var kme = Application("Keyboard Maestro Engine");
var oldValue = kme.getvariable('Calculation Result');
kme.setvariable('Calculation Result', { to: 10 });
For details on JXA, see JavaScript for Automation. This provides an introduction to JXA and comparison with AppleScript.
JavaScript
JavaScript in web browsers can access the variable values by using the document.kmvar dictionary, like document.kmvar.Variable_Name (spaces are converted to underscores).
User Interaction
AppleScripts and JavaScript For Automation scripts are executed in the background via osascript. This means they are not allowed to do user interaction. You can work around this by asking an application like System Events to do the user interaction for you, for example:
tell application "System Events"
  activate
  display dialog "Hello"
end tell
The osascript tool will execute in 64-bit mode, which may be a problem if you have old versions of AppleScript extensions installed. However, you can set the command line tool that is used to execute AppleScripts as described in Other Hidden Preferences.
See also the Variables section.
Controlling Keyboard Maestro via Scripting
The primary scripting interface to Keyboard Maestro is the Keyboard Maestro Engine’s do script support. You can ask Keyboard Maestro to:
- execute a macro by name
- execute a macro by unique ID
- execute an action given its XML code
Note in most cases you must ask “Keyboard Maestro Engine”, not “Keyboard Maestro”.
The easiest way is to use the name, for example:
tell application "Keyboard Maestro Engine"
  do script "[Name of Your Macro]"
end tell
The macro must be defined and enabled, and the macro group must be enabled and currently active.
If there is more than one macro with the same name, you will get an error, so you can use a UID instead of a name.
tell application "Keyboard Maestro Engine"
  do script "D0C150C7-8A0C-4837-918A-427E2BCFB6B9"
end tell
The do script will not return until the macro is finished executing.
You can pass an optional parameter using the with parameter clause, which you can read in the macro as the %TriggerValue% token.
You can determine a macro’s UID by selecting it and choosing Copy UID command in the Copy as sub-menu in the Edit menu.
You can trigger a macro using the kmtrigger: scheme with a URL like kmtrigger://macro=MacroName&value=Value (the value is accessible via the %TriggerValue% Token).
An even more powerful way to script Keyboard Maestro is to execute specific actions based on their XML code. This allows you to construct any action, including changing the action on the fly, without having to create a macro first. A simple example would be:
tell application "Keyboard Maestro Engine"
  do script "<dict><key>MacroActionType</key><string>SwitchToLastApplication</string></dict>"
end tell
The easiest way to determine the appropriate XML is to create an example action in an example macro and then export the macro.
You can read information about the existing macros using the gethotkeys and getmacros commands. See the Keyboard Maestro Engine AppleScript dictionary for more information.
You can disable or enable a Macro or Macro Group from AppleScript with:
tell application "Keyboard Maestro"
  setMacroEnable "Macro/Macro Group Group Name or UID" with/without enable
end tell
This actually asks the editor to disable or enable the macro or macro group, so the change is both visible and permanent.
Alternatively you can use the Set Macro Enable action.
You can start editing a Macro or Macro Group from AppleScript with:
tell application "Keyboard Maestro"
  editMacro "Macro/Macro Group Name or UID"
end tell
You can ask Keyboard Maestro Engine to reload the macros with:
tell application "Keyboard Maestro Engine"
  reload
end tell
You can also import macros, get the selected macros, or delete a macro or macro group from AppleScript. See the Keyboard Maestro AppleScript dictionary for more information.
Using Keyboard Maestro Facilities from AppleScript
Keyboard Maestro Engine makes several of its facilities available to AppleScript.
You can ask it to play a sound with:
tell application "Keyboard Maestro Engine"
  play sound alias "Harddisk:System:Library:Sounds:Glass.aiff"
end tell
You can ask Keyboard Maestro Engine to perform a calculation for you with:
tell application "Keyboard Maestro Engine"
  set n to calculate "JULIANDATE()"
end tell
You can ask Keyboard Maestro Engine to process tokens for you with:
tell application "Keyboard Maestro Engine"
  set clip to process tokens "%PastClipboard%3%"
end tell
URL Schemes
Editor
Another way you can control Keyboard Maestro Editor is using the “keyboardmaestro” URL scheme, which supports the following formats:
| Example Editor URL Command | Description |
|---|---|
keyboardmaestro://u=support%40stairways.com/s=ABCDEFGH0123456789 | enter your username/serial number. |
keyboardmaestro://m=Activate%20Application%20Switcherkeyboardmaestro://m=D2F427A1-51E3-4719-820B-4C25B6FF7329 | edit a specific macro or macro group. You may used either the Macro Name, or UUID. |
keyboardmaestro://q=Activate | filter macros with this keyword. |
keyboardmaestro://g=All%20Macros/q=Activate | select a macro group and filter macros with this keyword. |
keyboardmaestro://a=Execute | filter actions with this keyword. |
keyboardmaestro://c=All%20Actions/a=Execute | select action category and filter actions with this keyword. |
Triggers
You can trigger a macro (that is Active and Enabled) using the “kmtrigger” URL scheme.
The URL uses this format:
kmtrigger://macro=<Macro Name or UUID>[&<Trigger Value>]
where
<Macro Name or UUID>is either the Macro Name, OR, its UUID
<Trigger Value>is the optional Trigger Value[ ]are not included. Used only to show optional parameters&must precede the Trigger Value, if it is provided.
Note both Macro Name and Trigger Value must be URL encoded.
You can easily get the Trigger URL by clicking on the “Or by Script” Trigger option, and selecting “Or by URL”.
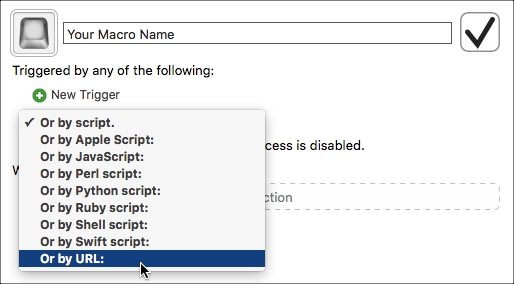
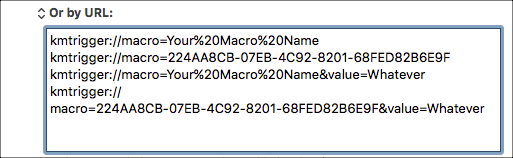
| Example Trigger URL Command | Description |
|---|---|
kmtrigger://macro=Your%20Macro%20Name | Using the Macro Name |
kmtrigger://macro=224AA8CB-07EB-4C92-8201-68FED82B6E9F | Using the Macro UUID |
kmtrigger://macro=Your%20Macro%20Name&value=Your%20Trigger%20Value | Using Macro Name with Trigger Value |
kmtrigger://macro=224AA8CB-07EB-4C92-8201-68FED82B6E9F&value=Your%20Trigger%20Value | Using Macro UUID with Trigger Value |
See also the Calculations and Tokens sections.
Status Menu Icons
Keyboard Maestro allows you to select the status menu icon.
The current lovely status menu icons were done by Iconaholic, and you can also use the Classic finger tapping icons. As well as that, you can get more status menu icons from our web site or the forum and you can create and optionally contribute your own versions. You can drop a new status menu icon .zip archive on the Keyboard Maestro application dock icon to install it.
The format is fairly simple, you need a folder with the name of the icon (which must be unique relative to other contributed icons), and in that folder you have a sequence of files named StatusItem and then then the animated sequence StatusItem1, StatusItem2, etc. You can have as many as you like. If the icon is a template icon (black and clear only), then add the word “Template” to the name. And finally the extension can be either .tiff or .png. The file should be either a 16×16 icon, or ideally a retina tiff file with both a 16×16 and 32×32 at 144dpi (you can create the retina-ready tiff files using tiffutil -cathidpicheck, or you can use a tool like Opacity.app).
The two default icon folder structures look like this:
- Classic
- StatusItem.tiff
- StatusItem1.tiff
- StatusItem2.tiff
- StatusItem3.tiff
- StatusItem4.tiff
- StatusItem5.tiff
- StatusItem6.tiff
- Iconaholic
- StatusItemTemplate.tiff
- StatusItem1Template.tiff
- StatusItem2Template.tiff
- StatusItem3Template.tiff
- StatusItem4Template.tiff
Note that the “Template” appears at the end, after the animation index, and there are no spaces anywhere. You can have spaces in the folder name.
Then you archive the folder into a zip file named NameStatusMenuIcon.zip (eg ClassicStatusMenuIcon.zip) and drop it on the Keyboard Maestro application dock icon or email it to us with a cover letter indicating your permission for it to be distributed, as well as your name to be published with an optional URL if desired.
Plug In Actions
Keyboard Maestro has support for user written and contributable plug in actions. You can get more plug in actions from our web site or the forum and you can create and optionally contribute your own. You can drop a new plug in action .zip archive on the Keyboard Maestro application dock icon to install it (note that to update a plug in action you must manually remove it from the ~/Library/Application Support/Keyboard Maestro/Keyboard Maestro Actions folder before re-installing it).
A Third Party Plug In Action consists of a folder with a name (which should generally closely match the action name), and must be made up of only ASCII alphanumerics, underscores and spaces. The folder name must be unique among all plug in actions. The folder name is stored in the Keyboard Maestro Macros.plist to reference the plugin action.
The folder contains a set of files, including:
- Keyboard Maestro Action.plist – an XML file describing the action.
- A script file whose name must be made up of only ASCII alphanumerics or underscores, plus an ASCII alphanumeric extension. It may be a shell script or an AppleScript. If it is a shell script, it will be made executable automatically.
- An optional 64×64 png icon.
The format of the Keyboard Maestro Action.plist is a Cocoa property list containing a dictionary with the following keys and values:
| Name | the name of the action (which appears in the Category/Actions list) |
| Script | the name of the script, made up of only ASCII alphanumerics or underscores, plus an ASCII alphanumeric extension |
| Icon [optional] | the name of the icon png file, made up of only ASCII alphanumerics or underscores plus .png |
| Title [optional] | the title displayed on the action, which can include %Param%XYZ% tokens. It should usually not include other tokens. If it is missing, the Name will be used |
| Timeout [optional number] | the default timeout in seconds. Set it to 0 if the action needs no timeout. The default is 99 hours |
| Author [optional] | the author of this action |
| URL [optional] | a URL for the author or this action |
| Help [optional] | a short (Tool Tip) explanation of this action |
| Results [optional] | what to do with the output of the script if any. Possible Values: None, Window, Briefly, Typing, Pasting, Variable, Clipboard – multiple values can be used, seperated by a bar (|), the first specified value is the default |
| Parameters [optional] | an array of parameters to the script, each entry is a dictionary as described below |
Each parameter in the Parameters array is a dictionary with the following keys:
| Label | the name of the parameter. The same rules as Keyboard Maestro Variable Names apply. The label is displayed to the user and used to pass the parameter to the script. Obviously, the label must be unique amongst all parameters |
| Type | the type of the parameter. Possible Values: String (single line), TokenString, Calculation, Text (multi-line), TokenText, Checkbox (0 or 1), PopupMenu or Hidden. The Type specifies how the value is displayed to the user and what processing is applied before it is passed to the script. Hidden types are text token processed, but are not displayed in the editor |
| Default [optional] | the default value when the action is created |
| Menu [required if Type is PopupMenu] | the values of the popup menu, separated by | |
Warning: Keys are case sensitive.
Parameters are passed to the script via environment variables with names starting with KMPARAM_ similar to how variables are passed to shell scripts with the Execute Script action. So a parameter named “My Text” would be in an environment variable KMPARAM_My_Text. You can access the envirnment variables from AppleScript with system attribute “KMPARAM_My_Text”. Note that AppleScript’s system attribute is not safe for international characters, although can use code like:
set myText to do shell script "echo $KMPARAM‗My‗Text"
In normal use, once a plug in action is read, it will stay in memory and changes will not be noticed (although the script will be executed each time, so changes to that will be noticed). To cause the editor and/or engine to notice changes to the plug while in development, use AppleScript to reload the macros:
tell application "Keyboard Maestro" to reload
tell application "Keyboard Maestro Engine" to reload
Keyboard Maestro Plug In Actions go in the ~/Library/Application Support/Keyboard Maestro/Keyboard Maestro Actions folder.
Windows
Welcome Window
This window welcomes new users and gives you some options for learning about Keyboard Maestro.
If you are new to Keyboard Maestro, start the tutorial and Keyboard Maestro will walk you through creating a simple macro.
Macros Window
This window lets you manipulate Macros and Macro Groups, creating new ones, deleting old ones, enabling and disabling them, editing them and so on.
You get this window pane by launching Keyboard Maestro.
The window contains a list of Macro Groups and their associated Macros.
You can create a new Macro Group by clicking the + button below the Groups list.
You can create a new Macro by selecting a macro group and then clicking the + button below the Macros list.
You can see the selected Macro Group or Macro in the right hand column, and edit it by clicking the Edit button.
You can select the All Macros meta-Group to show all Macros, and you can use the search field to filter down the list of macros.
You can rename a Macro Group or Macro by double clicking it and changing the title.
You can delete a Macro Group by selecting it and clicking the - button below the Groups list.
You can delete a Macro by selecting it and clicking the - button below the Macros list.
Similarly, you can enable or disable Macro Groups or Macros by clicking their respective ✓ button.
You cannot delete, rename or modify the Global Macro Group.
See also the Macro Groups, Macros and Macro Editor Window sections.
Tutorial
If you are new to Keyboard Maestro, start the tutorial by clicking the Start Tutorial button in the Welcome window or by choosing Tutorial from the Help menu and Keyboard Maestro will walk you through creating a simple macro.
Follow the instructions. Keyboard Maestro will hilight the location of the various buttons to help you quickly create a macro. You can even use the tutorial as a wizard to create a hot key triggered macro to perform any of Keyboard Maestro’s many actions.
Macro Group Editor
To edit a Macro Group, select it and click the Edit button. Its details will be shown in the right hand column. You can edit its name, control which applications it is available in, and how it will be activated.
Typically a group’s macros would be available everywhere (available in all applications), or it might be specific to a particular application (available in the following applications) in which case you might name the Macro Group after the application.
You can also configure the macro group to be activated only after a Hot Key press (either for a single use or toggled on and off), and whether to display the macros in a floating palette.
See also the Macros section.
Macro Editor Window
To edit a Macro, select it and click the Edit button. Its details will be shown in the right hand column. You can edit its name, add or remove triggers, and configure its action list.
To add a trigger, click the green ⊕ button and select the type of trigger. To remove a trigger, click the red ⊖ button.
To see how to execute this macro via a script, select from the “Or by script”’ menu. How you can execute the macro remotely is also displayed.
To add an action, click the New Action button, or equivalently the + button below the detail view. This will show the lists of possible actions. Double click one or more of them to add actions to the action list for this macro.
You can also Copy and Paste actions, as well as drag them around to rearrange them. Use the - button and ✓ button to delete or enable/disable the selected actions.
You can try the selected actions by clicking the Try button.
You can click the Record button to record your actions.
To learn more about creating or editing Macros, see the Macros section.
Macro Inspector Window
This window shows you information about the selected macro or macro group.
You get this window by choosing Macro Inspector from the Window menu.

Mouse Display Window
This window shows you the mouse location relative to any corner of the main screen or front window.
You get this window by choosing Mouse Display from the Window menu.

You can click the 🔒 button and then five seconds later Keyboard Maestro will lock the coordinates. You can click the 📋 button to copy the values, and you can change the relative corner even while the display is locked.
Macro Library Window
This window contains example and template macros you can add to your macro collection. You can use the macros as is, or edit them to customize them for your particular needs.
You get this window by choosing Macro Library from the Window menu.
Each entry represents one or more macros, usually in a single macro group, but occasionally in more than one macro group. You can learn about them by selecting them, and then you can insert them into your macros by clicking the Insert button or by dragging them to a particular macro group (dragging is not available if the library entry represents more than one macro group as you can't drag to two macro groups).
You can add macros to your library by choosing Export as Macro Library from the File menu and selecting the Add to My Macro Library checkbox. You can get Macro Library entries from us or from other Keyboard Maestro users and add them to you library by double clicking them or by choosing Import to Macro Library from the File menu.
Remember to use caution when installing a macro or macro library from anyone – macros can potentially do a lot of damage and compromise the security of your Mac, so only install macros from trusted sources. If you hold down all the modifiers (Command, Option, Control, Shift) when importing macros from a file they will be imported disabled (either the parent macro group will be disabled, or if it exists already, the macros themselves will be disabled). Alternatively, you can temporarily quit the Keyboard Maestro Engine while importing macros and verify their behaviour before relaunching the Engine.
Palette Theme Editor
This window allows you to configure the appearance of the various macro palette.
You can choose a style, the opacity of the palette, the size of the entries, the number of columns, whether the entries include the icon, the text and/or the trigger, and whether the palette shrinks when the mouse is not over it.
Icon Chooser Window
This window contains icons you can use to customize your macro and macro groups. You can click on an icon well in the macro or macro group editor and then show this window and select or create an icon for it.
You get this window by choosing Icon Chooser from the Window menu.
There are three types of icons available. Internal Keyboard Maestro icons:
application icons available on your Mac:

and icons you create by choosing a shape, color and optional character:
When creating icons, you can reference lots of characters:
Alternatively, you can copy an image from anywhere and paste it in to the icon well (although Keyboard Maestro stores a small reference to the Icon Chooser icons, so that is much more efficient that storing the image in your macros as copy & paste will).
Recording Window
This window shows you when Keyboard Maestro is recording your actions.
You get this window by clicking the Record button in the Macro Editor window or by triggering a Record Quick Macro action.
Clicking on this window will stop all recording, or you can pause recording, or add a 1 second Pause action to the current recording.
To learn more about recording, see the Recording section.
Macro Debugger
You get this window by choosing Start Debugging from the Status Menu menu by triggering a Debugger Start action.
To learn more about debugging, see the Macro Debugger section.
Conflict Palette
You get a conflict palette when a Hot Key would trigger two or more actions.
Note how the distinguisihing characters are highlighted – pressing those keys will select the desired trigger, or filter the list so that only those macros remain:

this continues until only one macro remains which is immediately executed.
Trigger Macro by Name
You get this window by executing the Trigger Macro by Name action.
Type a string to filter the macros.
Note that the filtering is not just by macro name.
Application Launcher Window
This window lets you launch applications.
You get this window by triggering the Activate Application Launcher macro.

To learn more about the Application Launcher, see the Application Launcher section.
Application Switcher Window
This window lets you switch between active applications, as well as quit or hide applications or quickly launch frequently used applications.
You get this window by triggering the Activate Application Switcher macro.
To learn more about the Application Switcher, see the Application Switcher section.
Window Switcher Window
This window lets you switch between windows in the current application, as well as close or minimize windows.
You get this window by triggering the Activate Window Switcher macro.
To learn more about the Window Switcher, see the Window Switcher section.
Clipboard Switcher Window
This window lets you select between named clipboards to Cut, Copy or Paste to/from.
You get this window by triggering one of the Activate Clipboard Switcher macros.
Select something and select a named clipboard and click the Cut button or Copy button to cut/copy to a named clipboard. Select a named clipboard and click the Paste button button to paste a named clipboard. Click the + button to create a new named clipboard. Select a named clipboard and click the Quick Look button to view it. Select a named clipboard and click the - button to delete it.
Click the x button to toggle whether the window should close after an action.
Use the search field to filter the named clipboards.
To learn more about the Clipboard Switcher, see the Named Clipboard Switcher section.
Clipboard History Switcher Window
This window lets you paste from your clipboard history of items that you have previously cut or copied.
You get this window by triggering the Clipboard History Switcher macro.
Cut or copy something and it will appear in this list. Select an item and click the Paste button button to paste a named clipboard. Select an item and click the ★ button (or press Command-L) to mark it as a favorite, or click the ✉ button (or press Command-S) to send it to another Mac. Select an item and click the - button to delete it (this is useful if you want to delete a password or other sensitive information).
To view an item more fully, select it and click the Quick Look button (or press Space) to display the Quick Look window.

To send a clipboard to another Mac running Keyboard Maestro, click the ✉ button to display the sending window.

Select the desired local destination, or type a host:port destination to send it to a remote Mac, and click the send button. Keyboard Maestro will keep trying to send to the Mac even if it can't connect right now, so as long as both Macs are connected to the Internet eventually, the clipboard should get through. While a clipboard is being sent, it is marked with a progress icon. If a clipboard is marked to be sent in the future, it is marked with a ➹. Once it has been successfully sent, it is marked with a ➚. If it fails to be sent, and Keyboard Maestro has given up, it is marked with a !. Clipboards that have been received are marked with a ✉.
Click the x button to toggle whether the window should close after an action.
Use the search field to filter the named clipboards.
To learn more about the Clipboard History Switcher, see the Clipboard History Switcher section.
Preferences Window
This window lets you configure Keyboard Maestro.
You get this window by launching Keyboard Maestro and choosing Preferences from the Keyboard Maestro menu.
To learn more about the Preferences, see the Preferences section.
Preferences General Pane
This window pane lets you configure general preferences.
Preferences Palettes Pane
This window pane lets you configure the default palettes style, as well as the global and conflict palette styles.
You can also configure whether the conflict palette appears under the mouse.

Preferences Web Server Pane
This window pane lets you configure the built-in web server which enables remote execution of macros.

Preferences Variables Pane
This window pane lets you add and remove variables, and see and change their values.

Preferences Clipboards Pane
This window pane lets you add, remove and rename Named Clipboards and see and change their values.
Preferences Exclude Pane
This window pane lets you add and remove applications from the global Excluded Applications list.

About Window Pane
This window shows you the version of this copy of Keyboard Maestro, to whom it is registered, and allows you to visit the web site.
You get this window by launching Keyboard Maestro and choosing About Keyboard Maestro from the Keyboard Maestro menu.

![]()
Keyboard Maestro App Menus
Below is a complete list of all menus. Note that in some cases you must hold down the OPT Key ⌥ to see the menu item. For example, the “Paste Above” item in the Edit menu:
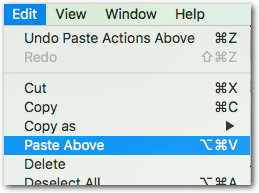
~~~~~~~~~~~~~~~~~~~~~~~~~~~~~~~~~~~~~~~~~~~~~~~~~~~~~~~~~~~~~~~~~~~~~~~
Keyboard Maestro
The Keyboard Maestro menu contains menu items relating to the Keyboard Maestro application as a whole.
About Keyboard Maestro
The About Keyboard Maestro command in the Keyboard Maestro menu displays the About Keyboard Maestro window.
Purchase Keyboard Maestro
The Purchase Keyboard Maestro command in the Keyboard Maestro menu lets you purchase Keyboard Maestro online.
Purchase Keyboard Maestro Upgrade
The Purchase Keyboard Maestro Upgrade command in the Keyboard Maestro menu lets you purchase an upgrade to Keyboard Maestro online.
Register Keyboard Maestro
The Register Keyboard Maestro command in the Keyboard Maestro menu displays the serial number entry window allowing you to enter your username (email address) and serial number. Make sure you enter them exactly as sent to you.
Check For Update
The Check For Update command in the Keyboard Maestro menu checks to see if there are any updates to Keyboard Maestro and offers to download and install them if there are.
Preferences
The Preferences command in the Keyboard Maestro menu displays the Preferences window.
Services
The Services command in the Keyboard Maestro menu is used to perform Mac OS X Services which are shared functions available across multiple applications. You can learn more about Mac OS X Services from your Mac OS X documentation, and you can install new services which will work with Keyboard Maestro. Keyboard Maestro includes full support for Services, so relevant Services on your system are available in Keyboard Maestro.
Hide Keyboard Maestro
The Hide Keyboard Maestro command in the Keyboard Maestro menu will hide the Keyboard Maestro application and all its windows. Click on Keyboard Maestro's Dock icon or choose Show All to show Keyboard Maestro again.
Hide Others
The Hide Others command in the Keyboard Maestro menu will hide all other applications. Choose Show All to show them again.
Show All
The Show All command in the Keyboard Maestro menu will show all hidden applications.
Quit Keyboard Maestro
The Quit Keyboard Maestro command in the Keyboard Maestro menu will Quit Keyboard Maestro. the Keyboard Maestro Engine will remain running and all enabled Keyboard Maestro features will continue to operate (unless you have specifically quit the Keyboard Maestro Engine).
~~~~~~~~~~~~~~~~~~~~~~~~~~~~~~~~~~~~~~~~~~~~~~~~~~~~~~~~~~~~~~~~~~~~~~~~~~~~~~~
File
The File menu is where you import or export Macros or launch or quit the Keyboard Maestro Engine.
New Smart Group
The New Smart Group command in the File menu creates and starts editing a new smart group.
New Macro Group
The New Macro Group command in the File menu creates and starts editing a new macro group.
New Macro
The New Macro command in the File menu creates and starts editing a new macro.
Close
The Close command in the File menu closes the front window.
Export Actions
The Export Actions command in the File menu exports the selected actions to a file that you can import later or on another Mac. You can also post the action export file on the forum or elsewhere to share it with others.
Export Macros
The Export Macros command in the File menu exports the selected macros to a file that you can import on another Mac. This is one way to transfered macros from one Mac to another.
Export as Macro Library
The Export as Macro Library command in the File menu exports the selected macros to a library file that you can share with others. If you create any interesting macros please consider sending them to us and we will make them available on our web site or in a future version of Keyboard Maestro.
See also the Macro Library section.
Import Actions
The Import Actions command in the File menu lets you select a saved action file and imports the actions it contains into the current macro.
Import Macros
The Import Macros command in the File menu lets you select a saved macro file and imports the macros it contains.
Import to Macro Library
The Import to Macro Library command in the File menu lets you import a shared macro library file into your macro library. Macros in your library are not active, but can be added into one or more macro groups to become active.
See also the Macro Library section.
Revert Macros
The Revert Macros command in the File menu lets you revert to a previous version of your macros. If you find you have really messed up your macros, you can revert to how they were when you first launched Keyboard Maestro, or how they were yesterday or even several days ago.
Start Syncing Macros
The Start Syncing Macros command in the File menu lets you start syncing your macros with another Mac.
See also the Macro Syncing section.
Reveal Macro Sync File
The Reveal Macro Sync File command in the File menu lets you see where your macro sync file is.
See also the Macro Syncing section.
Stop Syncing Macros
The Stop Syncing Macros command in the File menu lets you stop syncing your macros.
See also the Macro Syncing section.
Launch Engine
The Launch Engine command in the File menu lets you start the Keyboard Maestro Engine manually. The Keyboard Maestro Engine performs all the Macro, Application Switcher, Window Switcher and Clipboard Switcher functions even while Keyboard Maestro itself is not running. It is launched automatically as a Startup Item when you login (assuming you have not disabled that in the Preferences window) or any time you launch Keyboard Maestro. If it is not running for any reason you can start it manually with this command. This menu item only exists while the Keyboard Maestro Engine is not running.
Quit Engine
The Quit Engine command in the File menu lets you quit the Keyboard Maestro Engine. The Keyboard Maestro Engine performs all the Macro, Application Switcher, Window Switcher and Clipboard Switcher functions even while Keyboard Maestro itself is not running. It is launched automatically as a Startup Item when you login (assuming you have enabled that in the Preferences window). If you quit the Keyboard Maestro Engine these functions will no longer operate. This menu item only exists while the Keyboard Maestro Engine is running.
~~~~~~~~~~~~~~~~~~~~~~~~~~~~~~~~~~~~~~~~~~~~~~~~~~~~~~~~~~~~~~~~~~~~~~~~~~~~~~~
Edit
The Edit menu contains menu items relating to text and selections.
Undo
The Undo command in the Edit menu undoes the previous command.
Redo
The Redo command in the Edit menu redoes the previous undone command.
Cut
The Cut command in the Edit menu copies the current selection to the system clipboard and then deletes the selection.
Copy
The Copy command in the Edit menu copies the current selection to the system clipboard.
Copy as
The Copy as sub-menu in the Edit menu menu allows you to copy the selection in a variety of formats.
Copy as Text
The Copy as Text command in the Copy as sub-menu in the Edit menu menu allows you to copy the selected macro or actions as styled text.
Copy as Image
The Copy as Image command in the Copy as sub-menu in the Edit menu menu allows you to copy the selected macro or actions as an image.
Copy UID
The Copy UID command in the Copy as sub-menu in the Edit menu menu allows you to copy the selected macro or macro group’s UID.
Paste
The Paste command in the Edit menu pastes the current system clipboard into the current selection.
Paste Above
The Paste Above command in the Edit menu pastes the current system clipboard (containing actions) above the current selection.
Delete
The Delete command in the Edit menu deletes the current selection.
Select All
The Select All command in the Edit menu selects all text or items.
Deselect All
The Deselect All command in the Edit menu deselects all text or items.
Duplicate
The Duplicate command in the Edit menu duplicates the selected items.
Insert Action
The Insert Action command in the Edit menu lets you insert any of the many actions available in Keyboard Maestro.
Insert Action by Name
The Insert Action by Name command in the Edit menu lets you insert any of the many actions available in Keyboard Maestro by name.
Insert Token
The Insert Token sub-menu in the Edit menu lets you insert any of the many Tokens available in Keyboard Maestro. The token will be inserted, together with an example format of any parameters it takes.
Most text fields in Keyboard Maestro can process Tokens.
Variable
The Variable command in the Insert Token sub-menu in the Edit menu lets you insert any of your variables as a token (ie %Variable%VarName%)
Most text fields in Keyboard Maestro can process an expression containing Tokens including variables.
Insert Function
The Insert Function sub-menu in the Edit menu lets you insert any of the many functions available in Keyboard Maestro. The functions will be inserted, together with an example of any parameters it takes.
Most numeric fields in Keyboard Maestro can process an expression containing these functions.
Variable
The Variable command in the Insert Function sub-menu in the Edit menu lets you insert any of your variables.
Most numeric fields in Keyboard Maestro can process an expression containing variables.
~~~~~~~~~~~~~~~~~~~~~~~~~~~~~~~~~~~~~~~~~~~~~~~~~~~~~~~~~~~~~~~~~~~~~~~~~~~~~~~
View
The View menu contains menu items relating to display and actions.
Sort Macros by Name
The Sort Macros by Name command in the View menu sorts the macros in the main window by name.
Sort Macros by Trigger
The Sort Macros by Trigger command in the View menu sorts the macros in the main window by trigger. This is useful to see what hot keys are available, or to group all Typed String triggers together.
Sort Macros by Date Created
The Sort Macros by Date Created command in the View menu sorts the macros in the main window by the date created.
Sort Macros by Date Modified
The Sort Macros by Date Modified command in the View menu sorts the macros in the main window by the date modified (most recently modified at the top). This is useful to see what macros you have recently modified. You can also use the ◷ button at the top of the macro editor to show the recently modified macros.
Sort Macros by Date Used
The Sort Macros by Date Used command in the View menu sorts the macros in the main window by date used (most recently executed at the top). This is useful to see what macros you have recently executed, especially if you think one might have been executed inadvertently. You can also use the ⌘ button at the top of the macro editor to show the recently used macros.
Sort Macros by Use Count
The Sort Macros by Use Count command in the View menu sorts the macros in the main window by use count (most used macros at the top).
Sort Macros by Time Saved
The Sort Macros by Time Saved command in the View menu sorts the macros in the main window by time saved (most time saved at the top).
Expand Action
The Expand Action command in the View menu expands (discloses) the selected action(s). Hold the option key down to expand all actions in a given sublist.
Collapse Action
The Collapse Action command in the View menu collapses the selected action(s). Hold the option key down to collapse all actions in a given sublist.
Parent Action
The Parent Action command in the View menu moves the selection to the containing action.
Enter Action
The Enter Action command in the View menu moves the selection to the contained action.
Start Editing Macros
The Start Editing Macros command in the View menu turns on edit mode. Edit mode allows you to modify macros and macro groups. You may prefer to leave it on permanently, or you may like to turn it off when you are not making changes to give a more concise and visually appealing view of the macros and macro groups.
Stop Editing Macros
The Stop Editing Macros command in the View menu turns off edit mode.
Toggle Enable
The Toggle Enable command in the View menu toggles the enable of the selected items.
Show Actions
The Show Actions command in the View menu shows the action list. It is available while editing a macro. Double click or drag actions from the action list to add them to your macro. This menu toggles to Hide Actions when the action list is already showing.
Try
The Try command in the View menu tries the selected actions. It is available while editing a macro.
Record
The Record command in the View menu toggles recording on and off. It is available while editing a macro. Hold the option key down to record without a delay.
~~~~~~~~~~~~~~~~~~~~~~~~~~~~~~~~~~~~~~~~~~~~~~~~~~~~~~~~~~~~~~~~~~~~~~~~~~~~~~~
Window
The Window menu contains menu items relating to windows.
Minimize
The Minimize command in the Window menu minimizes the front window.
Zoom
The Zoom command in the Window menu zooms the front window.
Keyboard Maestro Editor
The Keyboard Maestro Editor command in the Window menu brings the main Keyboard Maestro macro editing window to the front.
Macro Library
The Macro Library command in the Window menu shows or hides the macro library.
See also the Macro Library section.
Icon Chooser
The Icon Chooser command in the Window menu shows or hides the Icon Chooser.
See also the Icon Chooser section.
Macro Inspector
The Macro Inspector command in the Window menu shows or hides the Macro Inspector.
See also the Macro Inspector Window section.
Mouse Display
The Mouse Display command in the Window menu shows or hides the Mouse Display.
See also the Mouse Display Window section.
Bring All to Front
The Bring All to Front command in the Window menu brings all Keyboard Maestro windows to the front.
~~~~~~~~~~~~~~~~~~~~~~~~~~~~~~~~~~~~~~~~~~~~~~~~~~~~~~~~~~~~~~~~~~~~~~~~~~~~~~~
Help
The Help menu contains menu items relating to Help.
Keyboard Maestro Documentation
The Keyboard Maestro Documentation command in the Help menu displays the Keyboard Maestro documentation web site.
Keyboard Maestro Quick Start
The Keyboard Maestro Quick Start command in the Help menu displays the Keyboard Maestro quick start help web page, which quickly gets you up to speed in using Keyboard Maestro.
Welcome to Keyboard Maestro
The Welcome to Keyboard Maestro command in the Help menu displays the Welcome message, giving you a quick overview of what support resources are available for helping you get started using Keyboard Maestro.
Keyboard Maestro Web Site
The Keyboard Maestro Web Site command in the Help menu takes you to the Keyboard Maestro web site.
Keyboard Maestro Wiki
The Keyboard Maestro Wiki command in the Help menu takes you to the Keyboard Maestro wiki.
Keyboard Maestro Forum
The Keyboard Maestro Forum command in the Help menu takes you to the Keyboard Maestro forum.
Stairways Software Web Site
The Stairways Software Web Site command in the Help menu takes you to the Stairways Software web site.
Tutorial
The Tutorial command in the Help menu starts the in-application tutorial. The tutorial will walk you through creating a simple macro. By varying the actions slightly, you can create a variety of macros that are triggered by hot keys and that open various documents.
ICU Date Format References
The ICU Date Format References command in the Help menu takes you to the ICU Date Format References web site.
ICU Regular Expression References
The ICU Regular Expression References command in the Help menu takes you to the ICU Regular Expression References web site.
Regular Expression Unicode Properties
The Regular Expression Unicode Properties command in the Help menu takes you to the Regular Expression Unicode Properties web site.
Third Party Licenses
The Third Party Licenses command in the Help menu displays the licenses folder containing the third party licenses for code used in Keyboard Maestro.
Open Logs Folder
The Open Logs Folder command in the Help menu displays the Keyboard Maestro Logs folder.
Open Preferences Folder
The Open Preferences Folder command in the Help menu displays the Keyboard Maestro Preferences folder.
Report Bugs or Feature Requests
The Report Bugs or Feature Requests command in the Help menu allows you to report any bugs you find or and features you would like implemented (hat tip to the wonderful image editor, Acorn).
Service and Support
The Service and Support command in the Help menu displays the service and support details, including how to contact us and where you can get more assistance.
~~~~~~~~~~~~~~~~~~~~~~~~~~~~~~~~~~~~~~~~~~~~~~~~~~~~~~~~~~~~~~~~~~~~~~~~~~~~~~~
Status Menu
The Status Menu menu appears on the right side of the menu bar showing (by default) the Keyboard Maestro icon (although you can control the icon in the General preference pane). It is generally visible any time the Keyboard Maestro Engine is running (unless you turn it off in the General preference pane). You use it to control the Keyboard Maestro Engine, to execute your Status Menu triggered macros, and to switch to applications.
Launch Keyboard Maestro Editor
The Launch Keyboard Maestro Editor command in the Status Menu menu launches Keyboard Maestro so you can edit your macros. You can also edit your macros directly by holding down the option key while choosing them in the Status Menu menu or in a palette.
Paste
The Paste command in the Status Menu menu includes the recent items in the clipboard history so you can easily paste in paste items using this menu.
Hold the Shift key down to paste as plain text, and the Option key down to just set the clipboard without pasting.
Cancel
The Cancel command in the Status Menu menu contains a list of all currently running macros and allows you to cancel them.
You can also cancel all currently running macros by holding all the modifiers (Command, Control, Option, Shift) down and clicking on the Status Menu menu.
Start Debugging
The Start Debugging command in the Status Menu menu opens the macrodebugger window and starts debugging.
See also the Macro Debugger section.
Quit Keyboard Maestro Engine
The Quit Keyboard Maestro Engine command in the Status Menu menu quits the Keyboard Maestro Engine.
Tips
Remembering Macro Hot Keys
Hot Key Macros are only useful if you can remember which key does what.
Consider using mnemonic Macros. For example, in your email client, you might define a set of Macros to Insert Text action, so use Control-A for your Address, Control-S for your Signature, Control-N for your Name, and so on.
Be consistent in your choice of Hot Keys. For example, use function keys to launch applications, Control-Function Keys to open documents, Control-Letter to insert text, and so on.
Keyboard Maestro also interoperates with KeyCue – if you use both applications and hold the control key down KeyCue will display all your active Hot Keys.
Use the Conflict Palette
If you have two or more macros with the same Hot Key, pressing that key will display the conflict palette, listing all the conflicting macros. You can then press further keys to filter the list until one remains (which is immediately executed).
Use the Trigger Macro by Name Action
Another way to reduce having to remember Hot Keys is to use the Trigger Macro by Name action to trigger macros based on their name.
Use the Insert Menus
In the editor, there are menus in the Edit menu to inserting actions, functions and text tokens. These can be very useful for both learning about what is available and quickly inserting elements. You can also use text completions to insert functions in numeric fields and tokens and text token fields.
If you hold down the Option key while selecting from this menu you can get help on any of the actions, functions or tokens.
Use the Insert Action by Name Menu
The Insert Action by Name command in the Edit menu (Command-Control-A) can allow you to quickly add an action while editing macros.
Use the Action Notes
You can leave yourself notes about an action or what you were doing by clicking the gear icon at top right of the action to choose Set Note… and then add a note to the action.
Pay Attention to the Gear Icon
The gear icon in the top right of the menu shows you a variety of different things depending on exactly how it looks.
If the action has a timeout, then a clock face will appear in the middle of the gear. If the timeout has been left as the default, the time will be three o'clock, otherwise the time will be an impossible 4.5 o'clock.
If the action has extra configuration options, the gear menu will have a blue center.
The gear menu itself also shows you whether the item has notes, and whether it will abort or notify you if the action fails.
And finally, the gear menu includes a Help command which will take you to the wiki help on the action.
Use Function Keys for Global Hot Keys
It is quite hard to come up with global Hot Keys that will not conflict with those keys used by any application (a conflict is not really a problem, the Macro Hot Key will simply override the application, but this is not always desirable). It is best to use function keys, especially in conjunction with modifiers, as global Hot Keys since they tend not to be used by most applications.
Use the Number Pad
Remember that the number pad is available (and distinct from the numbers on the main keyboard).
Troubleshooting
See the wiki Troubleshooting page for how to resolve any problems we have anticipated.
How do I get more help?
For more information about a specific Keyboard Maestro feature consult the Keyboard Maestro Documentation, post a question to the Keyboard Maestro Forum, visit the Keyboard Maestro web site or the Keyboard Maestro Wiki or contact us.
We always respond to email, however email is no longer a guaranteed medium and spam filters can delete your message to us or our message to you. Messages sent using the feedback form will always get to us, emails sent to us will pretty much always get to us, but if you do not receive a response within one business day check your spam filters to see if they have trapped our reply. If you use the feedback form and want a reply, make sure you enter your email address!
Support
For sales enquiries, customer service, technical support, or to contact project management, email us at support@stairways.com or use our Web Site Feedback Form.
Extensive online documentation on Keyboard Maestro can be found at Keyboard Maestro Documentation and on the wiki at Keyboard Maestro Wiki.
You can join the Keyboard Maestro Forum online community consisting of the developers and Keyboard Maestro users.
For ideas, see the Macro Examples section, or the Macro Library section of the Keyboard Maestro Wiki.
You can download Keyboard Maestro from https://download.stairways.com/. You can download old versions of our applications from the archive site at https://files.stairways.com/.
You can purchase Keyboard Maestro at https://purchase.stairways.com/.
You can look up your current or previous license status and serial numbers, and get information about discounted upgrades from https://enquiry.stairways.com/.
For more information about anything to do with Keyboard Maestro visit https://www.keyboardmaestro.com/.
Glossary
| Collection | An ordered sequence of strings that you can iterate through using the For Each action |
| Clipboard | The system clipboard is where you store items when you Copy and Paste. When you Copy an item, it is temporarily stored in the Clipboard and when you Paste, the item is copied from the Clipboard into your currently selection |
| Clipboard History | Normally the system stores only one clipboard. Keyboard Maestro keeps a history of your system clipboard, ensuring you never lose data on the clipboard and allowing you to copy and paste multiple items, |
| Clipboard Switcher | is a feature of Keyboard Maestro that allows you to copy or paste to/from a set of Named Clipboards |
| Excluded Applications | is the set of applications that should not appear in the Application Switcher list, allowing you to hide applications you rarely want to switch to. These applications are also ignored when hiding other applications |
| Global Macro Group | a predefined Macro Group that always exists and is the default location for new Macros |
| Growl | a system extension that lets Mac OS X applications unobtrusively tell you when things happen (more info) |
| GUID | see UUID |
| Hot Key | A keystroke that acts as a Macro Trigger to start the execution of Macro Actions in a Macro |
| KeyCue | software from ergonis that displays command keys and can also display Keyboard Maestro Hot Keys (more info) |
| Keyboard Maestro Engine | The process that enables your Macros, Application Switcher, Window Switcher, Named Clipboard Switcher and web server to work even after you quit Keyboard Maestro |
| Mac OS X | Apple’s operating system versions 10.0 and up |
| Mac OS | Apple’s operating system we’ve all come to know and mostly love |
| Macro | Macros are used to automate your workflow, procedure, or process on your Mac. A Macro consists of • A set of steps called Actions. • One or more Triggers to execute the Macro, if it is Active. |
| Macro Action | an action you wish to perform, such as opening a file, typing some text, controlling iTunes, and so on |
| Macro Group | a set of Macros which can be restricted to only a defined set of applications |
| Macro Palette | a floating palette containing any active Macros that have a Macro Palette trigger. The palette only appears in applications with at least once active Macro Palette triggered Macro |
| Macro Trigger | an event, such as a Hot Key, application launch, time of day, that starts the execution of a Macro |
| Michael Kamprath | the original developer of Application Switcher and Keyboard Maestro |
| Named Clipboard | Keyboard Maestro provides a set of named clipboards where you can permanently store information (text, logos, graphics, etc) |
| Notification Center | Mac OS X Mountain Lion introduced a system wide notification center which shows you alerts in the upper-right corner of your screen, without interrupting what you're doing |
| Palette | a floating window containing macros that you can trigger. There are several different kinds of palettes and you can style them in various ways |
| Program Switcher | the premier application management utility for Classic Mac OS, written by Michael Kamprath it was in part the inspiration for Keyboard Maestro and forms one of the components of Keyboard Maestro |
| Quick Macro | a macro recorded on the fly in another application. see the Recording section |
| Record Quick Macro | the action that when triggered records a Quick Macro. see the Recording section |
| Regular Expression | aka RegEx, a way of matching strings based on patterns. When Keyboard Maestro refers to “matching” it means by regular expression, in particular ICU Regular Expressions |
| Sandboxed | an Apple technology that limits what an application can do and how it can interface with the rest of the system and other applications. This is great for security for applications that work with just their own data, but is impossible with workflow applications like Keyboard Maestro, Automator and AppleScript Editor |
| Shortcut | a Shortcut is another name for a Macro (it is also another name for an Alias but that is a different context to the normal Keyboard Maestro Macro context) |
| Smart Group | a saved search set of Macros |
| Sorting Characters | You can control the sorting order of macros by prefixing two characters and a closing parenthesis to the name, eg “01)My Macro”. The prefix will be removed before displaying in the macro palette or status menu, but will be used to control the order of the macros shown. |
| Status Menu | the icon menus at the right of your menu bar |
| Text Tokens | See Tokens |
| Tokens | tokens allow you to insert dynamic text, such as the current date or time, into various text fields, see the Tokens section |
| Tokenized | see Tokens |
| Toolbar | see Palette |
| UID | see UUID |
| UUID | a Universally Unique IDentifier for Macros and Macro Groups and other purposes that remains the same even if you rename or modify a macro or macro group, or import a Macro built on another Mac. Also known as a GUID. |
| Z-order | refers to the order of windows from frontmost to furthest back |
Administrative Details
Requirements
Keyboard Maestro 7 requires Mac OS X 10.10.0 or later (10.10.3 or later recommended).
Distribution
You may distribute this application in any way you wish as long as you only distribute the unmodified Keyboard Maestro package, as downloaded from www.stairways.com. You may not break Keyboard Maestro up into its component files and distribute parts of it separately.
History
Following on the success of Application Switcher for Classic Mac OS, Michael Kamprath wrote Keyboard Maestro for Mac OS X and released it in early 2002. Incorporating an impressively powerful hot key macro facility, as well as Application and Clipboard Switching facilities, it rapidly became an indispensable tool for many Mac OS X users, including us here at Stairways Software.
Development continued on version 1 through the end of 2002, and then work began on version 2. The first beta of 2.0 was released in early 2003 and development continued until the 2.0b6 beta released in May 2003. After that, life and work got in the way. Keyboard Maestro languished for over a year as Michael found that he did not have the time or energy to continue development.
Around May 2004, we contacted Michael as a concerned user to query the long delay in the eagerly awaited 2.0 release. When we learned that Michael was considering abandoning the application we offered to purchase it from him to ensure that we would not lose this valuable tool, as well as to continue the fine tradition that he had started.
On June 30, 2004 the deal was struck and Stairways Software acquired all the rights to Keyboard Maestro. Our aim was to resolve the outstanding issues with Keyboard Maestro and release 2.0 as soon as possible, which we did in September 2004. Keyboard Maestro 2 introduced many new Macro Triggers (such as Application, Time of Day, and so on), Macro Groups to allow easy control over when macros are active, and many new actions.
Development of Keyboard Maestro competed for resources with development of Interarchy until the latter was sold to lead developer Matthew Drayton in early 2007. After a short break, development on Keyboard Maestro 3 started in earnest and resulted in many new features, including improved and streamlined user interface, recording, new triggers, built-in web server, new actions, and numerous minor enhancements. Keyboard Maestro 3 was released in April 2008 followed by a succession of releases over the rest of 2008.
Development of Keyboard Maestro 4 began in late 2008 and was released in late 2009. Version 4 was a complete rewrite of the user interface, bringing with it a modern look and feel reminiscent of various modern Apple applications. Further minor releases were made through 2010, followed by the initial release of Keyboard Maestro’s baby brother Switcher Maestro and the Mac App Store version in January 2011.
By that point, development of Keyboard Maestro 5 was well under way and was released in July 2011. Keyboard Maestro 5 built on the solid user interface of version 4, but added depth and breadth of power with almost no addition of complexity. Keyboard Maestro added such powerful features as control flow, conditions, variables, and calculations as well as many new actions, and enhancements to the application and clipboard history switchers. Further minor releases were made over the next year, adding things like a For Each action, File actions and Image actions.
Development of Keyboard Maestro 6 began in mid 2012 and was released in May 2013. Version 6 kept the user interface largely unchanged, while adding significant new features, including macro syncing, macro debugging, plug in actions, full support for styled text, support for controlling Safari and Google Chrome web browsers, trigger by name facility. Keyboard Maestro 6 also sported a stylish new icon from Iconaholic as well as customizable status menu icons and full Retina graphic support. It was followed by a succession of releases throughout 2013 and 2014.
Development of Keyboard Maestro 7 began in late 2014 was was released in July 2015. Version 7 concentrated on streamlining the editor, adding things like Smart Groups, auto-completion, Insert Action by name and menu, disclosure folding for sub-action lists, renaming, coloring, and adding notes to actions and more. Version 7 also added themed palettes, and the usual plethora of new actions and triggers. Macro Groups could now be targeted at specific windows, and macros could be triggered by window, folder or clipboard changes.
Going forward, we plan to develop Keyboard Maestro aggressively, bringing it to new levels of both power and ease of use in the long tradition of both Mac OS and Stairways Software.
Credits
Thanks to Michael Kamprath for all his work producing Keyboard Maestro.
Thanks to Alan Gentle for many example Macro ideas.
Thanks to Philippe Martin for some great beta testing.
Thanks to Dan Benjamin for doing the voice overs on the tutorial videos.
Thanks to Noah Kadner the voice overs on the intro video.
Thanks to Rakesh Kumar for the set of Switcher Macros.
Thanks to Sam Stephenson and the Prototype Core Team for the Prototype JavaScript Framework.
Thanks to Jono Hunt for the brilliant Iconaholic icon and other help.
Thanks also to:
- Jerry Krinock for NS(Attributed)String+Geometrics.
- John Gruber, Aristotle Pagaltzis for Title Case.
- Matt Gemmell – Magic Aubergine for MGAnimatedView and MGTemplateEngine.
- Michael Ash for MAKVONotificationCenter.
- Matthew Ball for MBCoverFlow.
- Keith Blount for KBWebArchiver.
- Random Ideas for NSTimer+Blocks.
- For OpenCV.
Thanks to Ken, Corentin, Stephen, Brad and others for their great assistance with beta testing.
Thanks to Christopher Stone and ComplexPoint and others for their great help on the forum.
Thanks to Andy for great help editing this documentation.
Thanks also to the many others who have provided input and support over the past decade.
Warranty
This application should do what we have described in this document. If it does not, you can simply stop using it. If you purchase it, and within 30 days find that it does not do what we have described here, then you can request a refund and your money will be refunded and we will cancel your license.
Licenses
Keyboard Maestro is copyright 2016 Stairways Software Pty Ltd. All Rights Reserved. You may use this application for a short trial period and then you must purchase the application or stop using it.
Keyboard Maestro is licensed on a per user basis and individual users may use it on up to five Macs. You must purchase a license for each user using Keyboard Maestro.
Trademarks owned by Third Parties such as Mac, Mac OS X, OS X, and BBEdit, are owned by their respective owners and no license is granted for their use.
Fine Print
Keyboard Maestro, keyboardmaestro.com and stairways.com are the property of Stairways Software Pty Ltd. Macros can be dangerous if misused, either accidentally or maliciously if you install a third-party macro. You are entirely responsible for the consequences of any macro execution. Stairways Software Pty Ltd hereby disclaims all warranties relating to this software, whether express or implied, including without limitation any implied warranties of merchantability or fitness for a particular purpose. Stairways Software Pty Ltd will not be liable for any special, incidental, consequential, indirect or similar damages due to loss of data or any other reason, even if Stairways Software Pty Ltd or an agent of theirs has been advised of the possibility of such damages. In no event shall Stairways Software Pty Ltd be liable for any damages, regardless of the form of the claim. The person using the software bears all risk as to the quality and performance of the software.
To be entirely clear, this software is provided “AS IS”. You waive the implied warranty of infringement. Stairways Software's liability to you for costs, damages, or other losses arising from your use of the software - including third-party claims against you - is limited to a refund of your license fee. Stairways Software may not be held liable for any consequential damages related to your use of the software.
Stairways Software can terminate your license by refunding your license fee.